
Managing roles
- Creating a role
- Locking a role
- Searching for a role
- Editing a role
- Deleting a role
- Viewing the members of a role
- Checking roles
The Roles tab on the User Management page allows you to create, search for, edit and delete roles.
As a reminder, a role is used to compartmentalise the different elements used in DigDash Enterprise - data models, Flows and pages - and thus secure access to data. One or more roles can be assigned to each user.
The role generally corresponds to a corporate function: HR, Finance, Production.
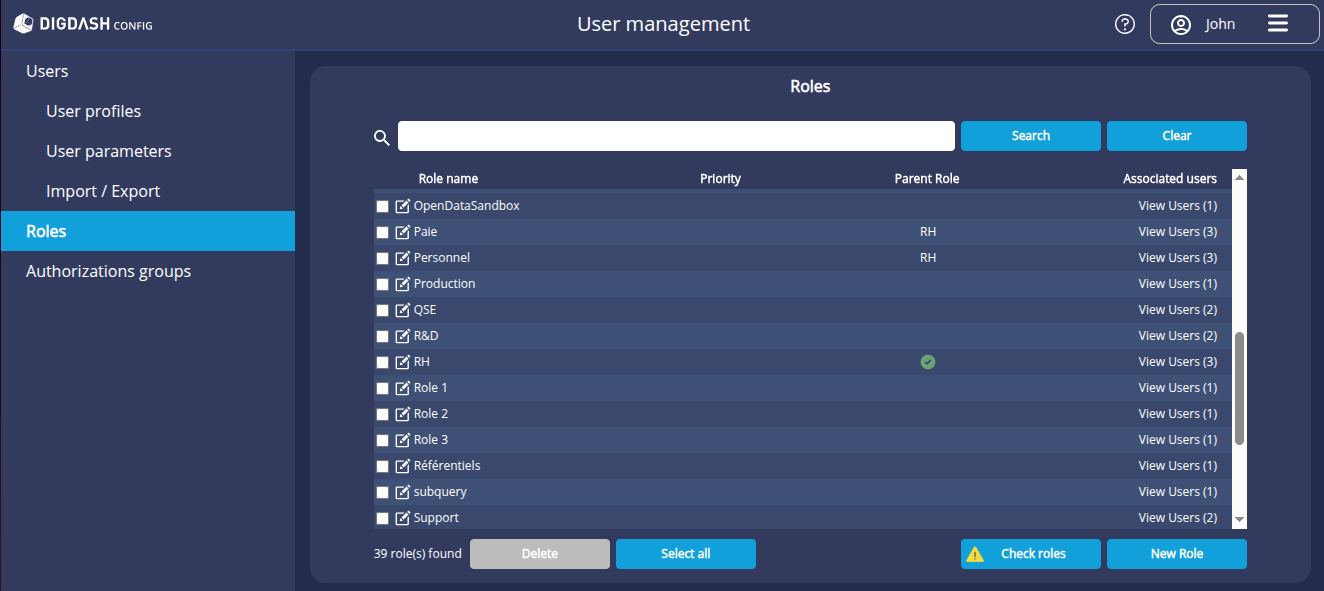
All existing roles are listed here.
For each role:
- the Priority, if defined, indicates the order in which the roles are displayed in the interfaces;
- the Parent Role column indicates the name of its parent role if it has one, or if it is a parent role via the icon
 . In the latter case, a tooltip displays the child roles;
 - you can see the number of users who have them in the Associated users column and display them by clicking on the View users (n) link.
Creating a role
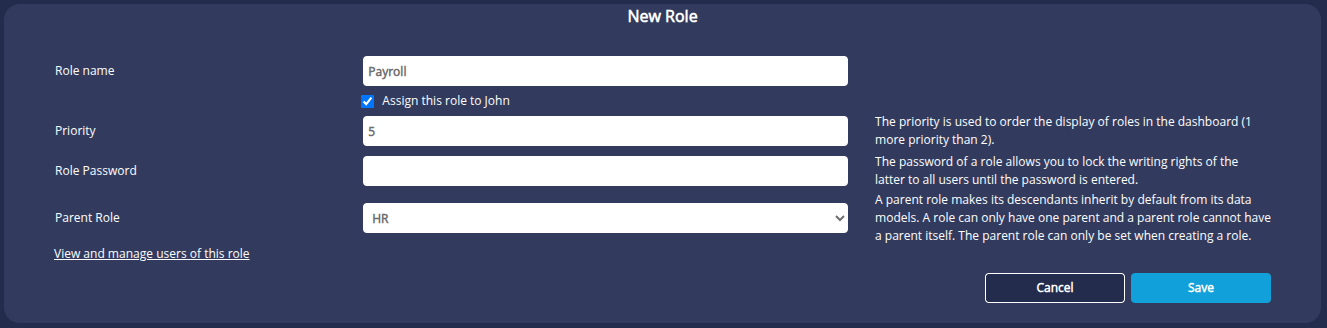
To create a role:
- Click the New Role button.
➡ The New Role window is displayed. - Enter the Name of the role.
- By default, the role is assigned to the user creating the role. Uncheck the Assign to Role Name box if required.
- Enter the Priority if required. Priority is used to manage the order in which roles are displayed in dashboards (and interfaces displaying the list of roles). The smaller the number, the higher the priority. The priority 1 role will be displayed before the priority 2 role. If the priority is not entered, alphabetical order will be used.
- You can define a Role Password to lock the role for all users: it will be protected from any modification until the password is entered. See the paragraph Lock a role below for more details.
- You can assign a Parent Role to the role so that it inherits its data models by default.
If data models are deleted/added in the parent role, they will also be deleted/added in the role; no refresh is required.
If a data model is added in the role, it will not be added to the parent role.
A role can only have one parent role. A parent role cannot itself have a parent. A role with a parent role (child role) cannot be a parent role.
❗It is no longer possible to modify the assigned parent role once the role has been created. The field will be greyed out.
- Click View and manage users to assign or remove this role to different users.
- Click Save.
Locking a role
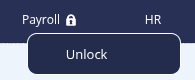
Configuring a password locks the role for all users until the password is entered, to protect it from modification.
Modification of the role's components will be locked in the Studio or Dashboard Editor (data models, flows, dashboard editing, items restricted to the role).
If the role is unlocked, it will be effective for the duration of the session. The role will be locked again the next time you log in.
- Editing the role
The role is indicated as locked. When saving a modification, the password is requested.

- Studio
A padlock icon is added after the role name and the New template or New Flow button is replaced by the Unlock role button.
In the Flow tab, a "Read only" indication and a padlock icon are also added after the portfolio name.
To unlock the role, click on the dedicated button or right-click on the role and then click on Unlock Role to enter the password.

- Dashboard Editor
A message tells the user that they do not have rights and a padlock icon is added after the role name.
To unlock the role, right-click on it and then click Unlock to enter the password.
Searching for a role
To search for a role, enter the search term in the search field and click Search.
When you type in the search bar, a list of roles is suggested.
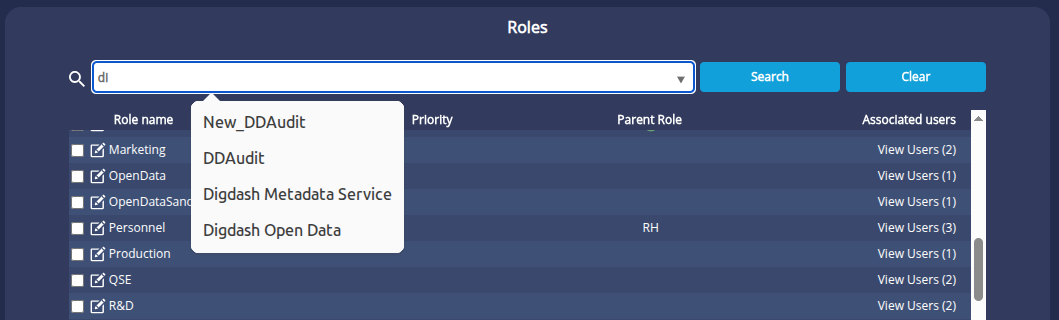
Click on a role in the pop-up list to edit it directly.
Editing a role
To edit a role :
- Click on the
 button in front of the role name.
 - In the edit panel that appears, you can view the role identifier.
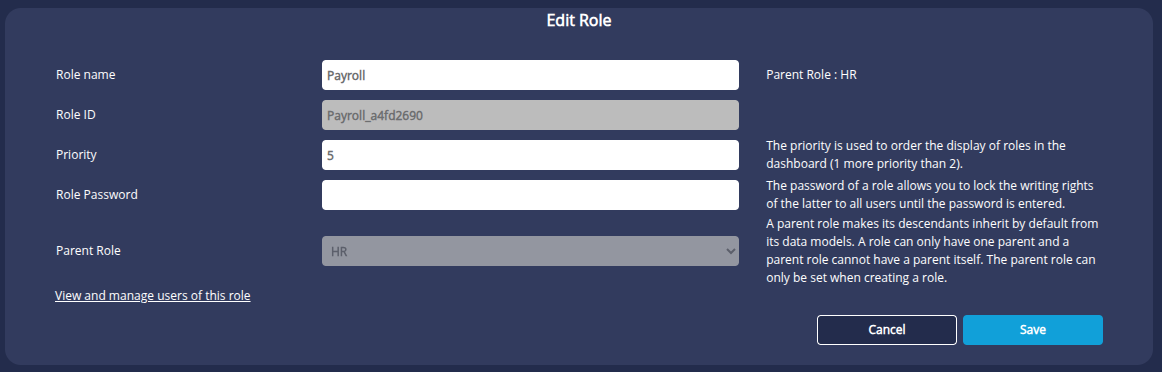
- Change the desired settings and click Save.
➡ A dialog box summarising the changes made is displayed.
- Click OK to confirm your changes.
Deleting a role
To delete one or more roles, select the corresponding checkbox(es) and click on the Delete button.
Viewing the members of a role
To view the users attached to a role, from the list of roles, click on the View users link . Users belonging to the role are displayed in the Users section.
Checking roles
The Check Roles function consists of identifying the roles pointed to by files present in the data folder but which do not exist in the LDAP. It is possible to repair them, i.e. add them back to the LDAP.
This can, for example, be useful in the event of an LDAP crash. All the LDAP entries for all the roles found in the data folder can be recreated in this way.
To do this
- Click on the Check Roles button.
➡ The Check Roles box is displayed.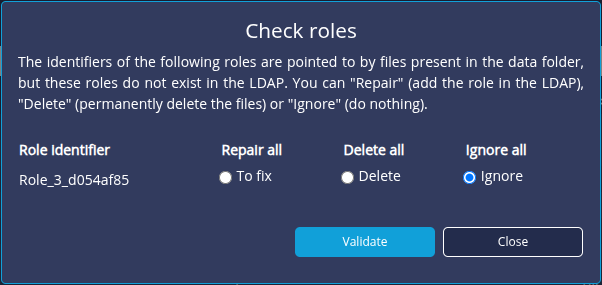
- Select Repair for each role to be added to the LDAP or Repair All to repair all the roles.
- or -
select Delete to delete a role permanently or Ignore to do nothing. - Click Validate.