
Installation on Ubuntu 24.04 with Tomcat 10
This guide provides installation and configuration instructions for a production environment on Ubuntu 24.04.
Different DigDash Enterprise installation archives are available for Tomcat 9 and Tomcat 10. In this case, you must use the Tomcat 10-specific archives named digdash_enterprise_2025R2_t10_64.zip or digdash_enterprise_2025R2_numpatch_t10_64.zip.
- Supported versions
- Digdash
- OpenDJ
- MariaDB (Recommended)
- NGINX (Optional)
- Configuring DigDash after installation
This document describes how to install DigDash on Linux with Ubuntu 24.04.
For installation on Linux with Ubuntu 22.04, please refer to the document Installation on Ubuntu 22.04 with Tomcat 9.
For installation on Windows, please refer to the document Windows Installation Guide.
To update an existing installation, please refer to the document Upgrade Guide.
Supported versions
The following versions are supported:
- Tomcat 10: latest patch
- Java : OpenJDK 17
- OpenDJ: version 4.8.0 and later
- MariaDB: OS version or latest LTS version, latest patch
- Nginx: system version
Digdash
OpenJDK
sudo apt install openjdk-17-jdk
# Check installation
java -version
Tomcat 10
Installation
Creating the tree structure
sudo mkdir -p /home/digdash/webapps/default/
# Working directory
sudo mkdir -p /home/digdash/appdata/default/
# Location of the .properties file
sudo mkdir -p /etc/digdash/
# Location of logs
sudo mkdir -p /var/log/digdash/
Changing folder permissions
sudo chown -R tomcat:tomcat /var/log/digdash
sudo chmod a+w /var/log/digdash
Configuring server.xml
Location: /etc/tomcat10/server.xml
Location of webapps
<Host name="localhost" appBase="webapps"
# by this one
<Host name="localhost" appBase="/home/digdash/webapps/default"
Valve Connector
<Connector port="8080" protocol="HTTP/1.1"
connectionTimeout="20000"
redirectPort="8443" ></Connector>
# as follows
<Connector port="8080" protocol="HTTP/1.1"
connectionTimeout="20000"
maxConnections="30000"
maxParameterCount="100000"
maxThreads="10000" maxPostSize="62914560"
redirectPort="8443" compression="on" ></Connector>
Valve Reverse Proxy
<Valve className="org.apache.catalina.valves.RemoteIpValve"
internalProxies="127\.0\.[0-1]\.1"
remoteIpHeader="X-Forwarded-For"
requestAttributesEnabled="true"
protocolHeader="X-Forwarded-Proto"
protocolHeaderHttpsValue="https"></Valve>
In the case of an ipv6 server, use :
internalProxies="127\.0\.[0-1]\.1|0:0:0:0:0:0:0:1|::1"
remoteIpHeader="X-Forwarded-For"
requestAttributesEnabled="true"
protocolHeader="X-Forwarded-Proto"
protocolHeaderHttpsValue="https"></Valve>
Valve Log
<Valve className="org.apache.catalina.valves.ErrorReportValve" showReport="false" showServerInfo="false" ></Valve>
Limit the localhost_access_log file (optional)
To limit the size of the localhost_access_log file, add the maxDays parameter to the Access Log valve and give it the value of the number of days of your choice.
<Valve className="org.apache.catalina.valves.AccessLogValve" directory="logs"
prefix="localhost_access_log" suffix=".txt"
pattern="%h %l %u %t "%r" %s %b" maxDays="10" ></Valve>
Editing the context.xml file
Location: /etc/tomcat10/context.xml
<Resources cachingAllowed="true" cacheMaxSize="500000"></Resources>
Changing RAM
sudo vi /etc/default/tomcat10
# Replace the existing JAVA_OPTS by
JAVA_OPTS="-Djava.awt.headless=true -Xms6G -Xmx6G -Djava.security.egd=file:/dev/urandom -Dfile.encoding=UTF-8 -DPROP_MAX_CONCURRENT_TOTAL=5000 -DPROP_MAX_CONCURRENT_CON_PER_HOST=5000 --add-opens=java.base/java.nio=org.apache.arrow.memory.core,ALL-UNNAMED --add-opens=java.base/sun.security.ssl=ALL-UNNAMED --add-opens=java.base/sun.security.util=ALL-UNNAMED"
# Change the 6G parameter depending on the capacity of the machine, leaving at least 2G for the OS.
# In the example above, the machine has 8G of RAM.
# It is recommended to use the same value for Xms and Xmx.
Activating log write permission for tomcat
sudo mkdir -p /etc/systemd/system/tomcat10.service.d
# Create file
sudo vi /etc/systemd/system/tomcat10.service.d/logging-allow.conf
# Add the following lines
[Service]
ReadWritePaths=/var/log/digdash/ /home/digdash/
#Reload the "daemon" configuration
sudo systemctl daemon-reload
sudo systemctl restart tomcat10.service
Enabling automatic service start on startup
Deployment of Digdash Version 2025 R2
Properties files
Place the digdash.properties file (contained in the root of the unzipped folder) in the /etc/digdash folder.
Create the following files in the /etc/digdash folder:
Modify the digdash.properties file previously copied
# Log files location
ddenterpriseapi.ddlog4j.properties.file=/etc/digdash/log4j2_api.properties
studio.ddlog4j.properties.file=/etc/digdash/log4j2_studio.properties
digdash_dashboard.ddlog4j.properties.file=/etc/digdash/log4j2_dash.properties
# Appadata location
ddenterpriseapi.AppDataPath=/home/digdash/appdata/default
digdash_dashboard.AppDataPath=/home/digdash/appdata/default
studio.AppDataPath=/home/digdash/appdata/default
adswrapper.ads.instance.name=/home/digdash/appdata/default/ldapdigdash
adminconsole.adminconsole_domain=adminconsole
adminconsole.webstudio_domain=studio
adminconsole.server_domain_list=ddenterpriseapi
adminconsole.dashboard_domain=digdash_dashboard
studio.DOMAIN=ddenterpriseapi
studio.FORCEDOMAIN=true
studio.SERVERURL=http://localhost:8080
studio.FORCESERVERURL=true
studio.adminconsole_domain=adminconsole
digdash_dashboard.DOMAIN=ddenterpriseapi
digdash_dashboard.FORCEDOMAIN=true
digdash_dashboard.SERVERURL=http://localhost:8080
digdash_dashboard.FORCESERVERURL=true
digdash_dashboard.adminconsole_domain=adminconsole
# IODS scripts location
studio.iods_exe_path=path/to/IODS/scripts
ddenterpriseapi.iods_exe_path=path/to/IODS/scripts
# NodeJS export
ddenterpriseapi.DDAPIFORNODEJSURL=http://localhost:8080
ddenterpriseapi.NODEJSURL=http://localhost:4000 #Random value between 4000 and 3000 different for each environment hosted on the same Tomcat
########### Nettoyage automatique des fichiers programmé
########### Scheduled automatic file cleaning
ddenterpriseapi.startCleaner=true
########### Nettoyage des fichiers inutilisés au démarrage du serveur
########### Clean up unused files on server startup
ddenterpriseapi.cleanOnStart=false
########### Sauvegarde automatique programmée
########### Scheduled automatic backup
ddenterpriseapi.autoBackup=true
ddenterpriseapi.autoBackupKeepDays=20
digdash_dashboard.CANCHANGEPASSWORD=true
Location of war files
Place the following items (contained in the apache_tomcat/webappps directory of the unzipped folder) in the /home/digdash/webapps/default folder :
- adminconsole.war
- ddenterpriseapi.war
- digdash_dashboard.war
- studio.war
- the ROOT/ folder
OpenDJ
Installation
- Start by downloading the latest version of the opendj-4.x.x_all.debfile from the website https://github.com/OpenIdentityPlatform/OpenDJ/releases :
- Start the installation:
Initial configuration
To simplify the OpenDJ configuration process, we will create a “setupOpenDJ.props” file containing the available options to be passed to OpenDJ’s “setup” utility (this allows you to bypass the configuration interface).
The contents of this file are detailed below:
# Sample properties file to set up OpenDJ directory server
# See OpenDJ Setup command man for more options
#
# Root user Distinguished Name (DN) identifies a user who can perform all operations allowed for the server
rootUserDN =cn=Directory Manager
# Password for root user LDAP
rootUserPassword =adminOpenDJ1
# OpenDJ uses fully qualified host name in self-signed certificates and for identification when you use replication
hostname =localhost.localdomain
# Port used for connection with LDAP
ldapPort =389
# This is the service port used to configure the server and to run tasks
adminConnectorPort =4444
# Identifies the implementation of the repository that holds your data
backendType =je
# Directory Name for your LDAP
baseDN =dc=digdash,dc=com
addBaseEntry =true
# Secure LDAP Port used for SSL connection
ldapsPort =636
# Use StartTLS to negotiate a secure connection between a client and server
enableStartTLS =false
# Self-signed certificates for externally facing ports facilitate testing, but are not intended for production use
generateSelfSignedCertificate =true
# Start at the end of setup
start =true
After saving the file, run the following command line:
Additional configuration
- Navigate to the OpenDJ installation directory:
The LDIF files can be downloaded by clicking on the following link .
- Create the organisations using the “neworganisation.ldif” file below:
objectClass: organizationalUnit
ou: default

- Set the “Custom Character-set Password Validator”:
- Apply the password validator:
- Configure the password policy for users using the “ppolicy.ldif” file below:
objectClass: top
objectClass: subentry
objectClass: pwdPolicy
cn: ppolicy
pwdAttribute: userPassword
pwdAllowUserChange: TRUE
pwdCheckQuality: 1
pwdExpireWarning: 600
pwdFailureCountInterval: 30
pwdGraceAuthNLimit: 5
pwdInHistory: 5
pwdLockout: TRUE
pwdLockoutDuration: 900
pwdMaxAge: 0
pwdMaxFailure: 5
pwdMinAge: 0
pwdMustChange: FALSE
pwdSafeModify: FALSE
subtreeSpecification: {base "ou=users", specificationFilter "!(uid=admin)" }
- Configure a second password policy for the admin using the “ppolicy-admin.ldif” file below:
objectClass: top
objectClass: subentry
objectClass: pwdPolicy
cn: ppolicy-admin
pwdAttribute: userPassword
pwdAllowUserChange: TRUE
pwdCheckQuality: 1
pwdFailureCountInterval: 30
pwdGraceAuthNLimit: 5
pwdInHistory: 5
pwdLockout: FALSE
pwdMaxAge: 0
pwdMinAge: 0
pwdMustChange: FALSE
pwdSafeModify: FALSE
subtreeSpecification: {base "ou=users", specificationFilter "(uid=admin)" }
- Modify the password policy to allow pre-encoded passwords (useful for restores in Digdash):
- Create an admin user for Digdash using the “create_user_admin.ldif” file below:
objectClass: shadowAccount
objectClass: inetOrgPerson
cn: Admin Domain Default
sn: Default
uid: admin_default
- Assign the necessary rights to this user using the “add_admin_right.ldif” and “add_admin_right2.ldif” files below:
changetype: modify
add: aci
aci: (target ="ldap:///ou=default,dc=digdash,dc=com")(targetattr = "userpassword || shadowlastchange")(version 3.0; acl "allow write on userpassword and shadowlastchange for admin"; allow(write) (userdn = "ldap:///uid=admin,ou=default,dc=digdash,dc=com");)
aci: (target ="ldap:///ou=default,dc=digdash,dc=com")(targetattr = "userpassword || shadowlastchange")(version 3.0; acl "allow read,write on userpassword and shadowlastchange for auth users"; allow(read) (userdn = "ldap:///all");)
aci: (target ="ldap:///ou=default,dc=digdash,dc=com")(targetattr = "userpassword || shadowlastchange")(version 3.0; acl "allow read on userpassword and shadowlastchange for anonymous"; allow(selfwrite) (userdn = "ldap:///anyone");)
aci: (target ="ldap:///ou=default,dc=digdash,dc=com")(targetattr = "*")(version 3.0; acl "allow write on * for admin"; allow(all) (userdn = "ldap:///uid=admin,ou=default,dc=digdash,dc=com");)
aci: (target ="ldap:///ou=default,dc=digdash,dc=com")(targetattr = "*")(version 3.0; acl "allow read on * for anonymous"; allow(read) (userdn = "ldap:///all");)
changetype: modify
add: ds-privilege-name
ds-privilege-name: config-read
ds-privilege-name: password-reset
ds-privilege-name: unindexed-search
- Generate a password for the administrator and make a note of it for later:
Enabling the service to start automatically at boot
- Create the opendj.service file:
- And paste the following lines into it:
Description=OpenDJ Server Daemon
Wants=network-online.target
After=network-online.target
Conflicts=shutdown.target
[Service]
Type=simple
Restart=no
TimeoutSec=5min
IgnoreSIGPIPE=no
KillMode=process
GuessMainPID=no
RemainAfterExit=yes
ExecStart=/opt/opendj/bin/start-ds --quiet
ExecStop=/opt/opendj/bin/stop-ds --quiet
[Install]
WantedBy=multi-user.target
- Then enter the following commands:
systemctl daemon-reload
systemctl enable --now opendj
systemctl status opendj
Useful function
The operation below is not part of the installation.
However, it may be useful to be aware of it for future reference.
Extending the limit for LDAP searches
To increase the limit on the number of results returned during a search to more than 1,000 users, edit the “extend_search_limit.ldif” file below:
changetype: modify
add: ds-rlim-size-limit
ds-rlim-size-limit: 10000
To increase the number of entries scanned during a search, add the “ds-rlim-lookthrough-limit.ldif” file:
changetype: modify
replace: ds-rlim-lookthrough-limit
ds-rlim-lookthrough-limit: 100000
Then run:
MariaDB (Recommended)
The MariaDB database will be used to store the following elements: comments, audit data and data entry.
This database is more durable than an H2 database, that is why we recommend its use. If you already have a database that Digdash can write to and read from then proceed to the configuration step.
Mysql and Postgresql are also compatible.
Installation
sudo systemctl start mariadb
#Stop mariadb
sudo systemctl stop mariadb
#Reload to take into account the configuration changes
sudo systemctl reload mariadb
sudo systemctl force-reload mariadb
#Display the version
mariadb --version
Launch mysql_secure_installation. This will secure the installation.
# Enter yes at all steps
Enabling automatic service start on startup
Database configuration
We will create a base for each domain and each webapps (for example prod_ddaudit and dev_ddaudit and so on)
In the example below, we will consider that there is only one 'default' environment.
sudo mariadb -u root -p
# Create all necessary databases domain_module.
CREATE DATABASE default_ddaudit;
CREATE DATABASE default_comment;
CREATE DATABASE default_ddentry;
# Create a user for each database domaine_user_module. The password is a new one to create.
CREATE USER 'default_user_ddaudit'@'localhost' IDENTIFIED BY 'mynewpassword';
CREATE USER 'default_user_comment'@'localhost' IDENTIFIED BY 'mynewpassword';
CREATE USER 'default_user_ddentry'@'localhost' IDENTIFIED BY 'mynewpassword';
# Assign rights on the databases to the user
GRANT ALL PRIVILEGES ON default_comment.* TO 'default_user_comment'@'localhost';
GRANT ALL PRIVILEGES ON default_ddaudit.* TO 'default_user_ddaudit'@'localhost';
GRANT ALL PRIVILEGES ON default_ddentry.* TO 'default_user_ddentry'@'localhost';
NGINX (Optional)
Nginx is used as reverse proxy.
Installation
Enabling automatic service start on startup
Configuration
Create the configuration file with the name of your machine or environment. In this example, we use 001-digdash.
In the /etc/nginx folder:
sudo vi /etc/nginx/sites-available/001-digdash.conf
# Replace .mondomaine.com by seerver et paths for Certificate(s) and private key, by your information.
upstream backend_tomcat{
least_conn;
server localhost:8080 fail_timeout=0;
}
server {
listen [::]:80;
listen 80;
server_name *.mondomaine.com;
# Redirect all non-https requests
rewrite ^ https://$host$request_uri? permanent;
error_log /var/log/nginx/digdash.com.error_log warn;
access_log /var/log/nginx/digdash.com.access.log;
}
server {
listen [::]:443 ssl http2 default_server;
listen 443 ssl http2 default_server;
server_name *.mondomaine.com;
client_max_body_size 4G;
proxy_read_timeout 300;
proxy_connect_timeout 300;
proxy_send_timeout 300;
error_log /var/log/nginx/digdash.com.error_log warn;
access_log /var/log/nginx/digdash.com.access.log;
# Certificate(s) and private key
ssl_certificate_key /emplacement/de/la/clé/macle.key;
ssl_certificate /emplacement/du/certificat/moncertif.crt;
# DigDash Management SSL
include digdash_ssl_params;
# Security headers
add_header X-Frame-Options "SAMEORIGIN"; ## !Warning! if the DigDash portal is used in another site, do not use!
add_header X-Content-Type-Options "nosniff";
add_header Content-Security-Policy "connect-src 'self' https://www.overpass-api.de;";
add_header Strict-Transport-Security "max-age=31536000";
location / {
include proxy_params;
rewrite ^(/digdash_dashboard.*)/index.html(.*)$ $1/index.jsp permanent;
rewrite ^(/digdash_dashboard.*)/index-editor.jsp(.*)$ $1/index-editor.html permanent;
proxy_intercept_errors on;
proxy_pass http://backend_tomcat;
proxy_cookie_path ~^/(.+)$ "/$1; HTTPOnly; Secure;samesite=none;";
}
location ~* ddenterpriseapi.*(/api/v1/|/v2/) {
include proxy_params;
proxy_intercept_errors off;
proxy_pass http://backend_tomcat;
proxy_cookie_path ~^/(.+)$ "/$1; HTTPOnly; Secure;samesite=none;";
}
}
ℹ Security Headers
X-Frame-Options
The X-Frame-Options HTTP response header can be used to indicate whether a browser should be allowed to display a page within a <frame>, <iframe>, <embed>, or <object> element. Sites can use this header to prevent clickjacking attacks and ensure their content is not embedded in other sites.
Be careful if the DigDash portal is used on another site; this header should not be included.
X-Content-Type-Options
The X-Content-Type-Options header is a flag used by the server to indicate that the MIME types advertised in the Content-Type headers should not be modified or tracked. This allows for a break from MIME type sniffing.
Content-Security-Policy
The Content-Security-Policy HTTP response header allows website administrators to control which resources the user agent is allowed to load for a given page. While there are some exceptions, these rules most often involve defining server origins and script access points. This header helps protect against cross-site scripting (XSS) attacks.
Strict-Transport-Security
The Strict-Transport-Security (often abbreviated as HSTS) HTTP response header informs browsers that the site should only be accessed using HTTPS and that any future attempts to access it using HTTP should be automatically upgraded to HTTPS.
Then create a symbolic link in sites-enabled
Create the digdash_ssl_params file containing the security policy:
# openssl dhparam 4096 -out /etc/ssl/dhparam.pem
#ssl_dhparam /etc/ssl/dhparam.pem;
ssl_protocols TLSv1.3 TLSv1.2;
ssl_prefer_server_ciphers on;
ssl_ecdh_curve secp521r1:secp384r1;
ssl_ciphers ECDHE-ECDSA-AES128-GCM-SHA256:ECDHE-RSA-AES128-GCM-SHA256:ECDHE-ECDSA-AES256-GCM-SHA384:ECDHE-RSA-AES256-GCM-SHA384:ECDHE-ECDSA-CHACHA20-POLY1305:ECDHE-RSA-CHACHA20-POLY1305:DHE-RSA-AES128-GCM-SHA256:DHE-RSA-AES256-GCM-SHA384:DHE-RSA-CHACHA20-POLY1305;
ssl_prefer_server_ciphers off;
ssl_session_cache shared:TLS:2m;
ssl_buffer_size 4k;
# OCSP stapling
ssl_stapling on;
ssl_stapling_verify on;
resolver 1.1.1.1 1.0.0.1 [2606:4700:4700::1111] [2606:4700:4700::1001]; # Cloudflare
# Set HSTS to 365 days
add_header Strict-Transport-Security 'max-age=31536000; includeSubDomains; preload' always;
Configuring DigDash after installation
Launching Digdash
- Restart the Tomcat service.
- Check the war deployment in the home/digdash/webapps/default installation folder.
- Access DigDash at the following address http://localhost:8080/adminconsole ..
The login / password will be admin / admin.
Connecting Digdash to the installed OpenDJ server
Open http://localhost:8080/adminconsole/, Configuration -> Server settings -> Servers -> LDAP Server.
- Port: 389
- User: uid=admin, ou=default,dc=digdash,dc=com
- Password: OpenDJ admin password
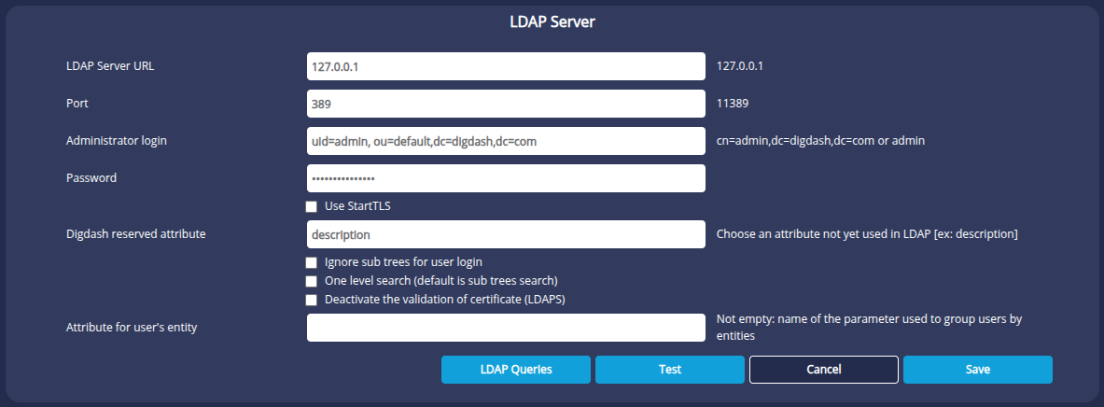
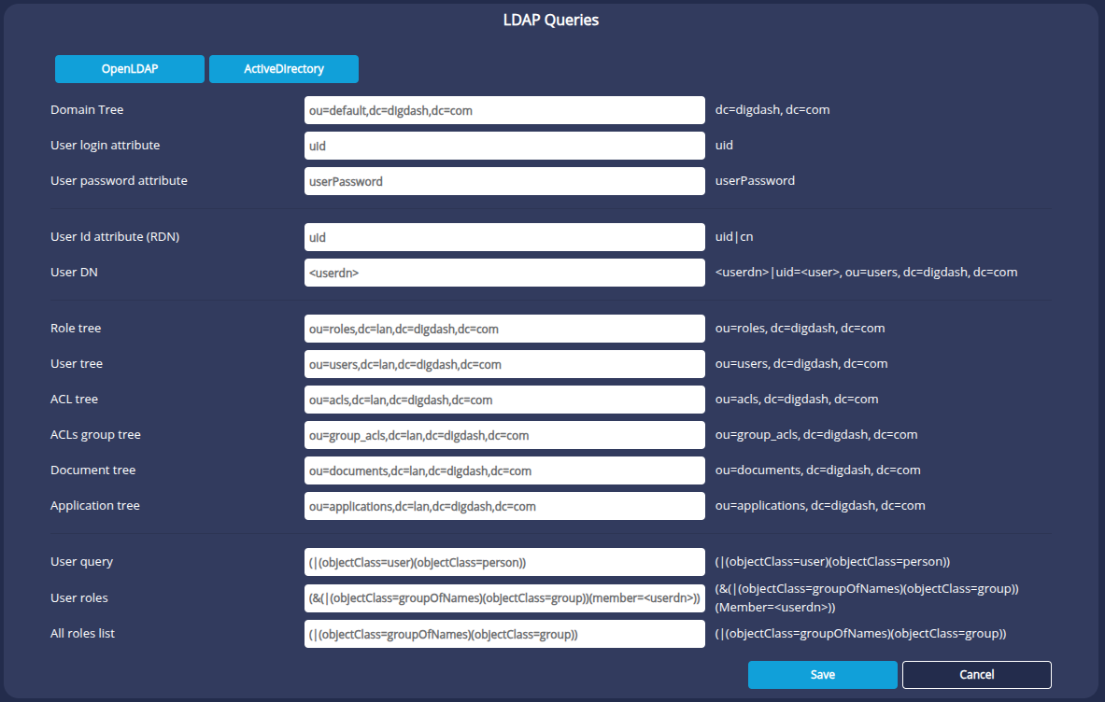
Then click the LDAP Queries button and fill in the fields as below:
Changing the supervisor password and creating the LDAP account
Changing the supervisor password
Open Configuration -> Server settings > Servers -> Enterprise Server and enter a new password in the Supervisor Password field.

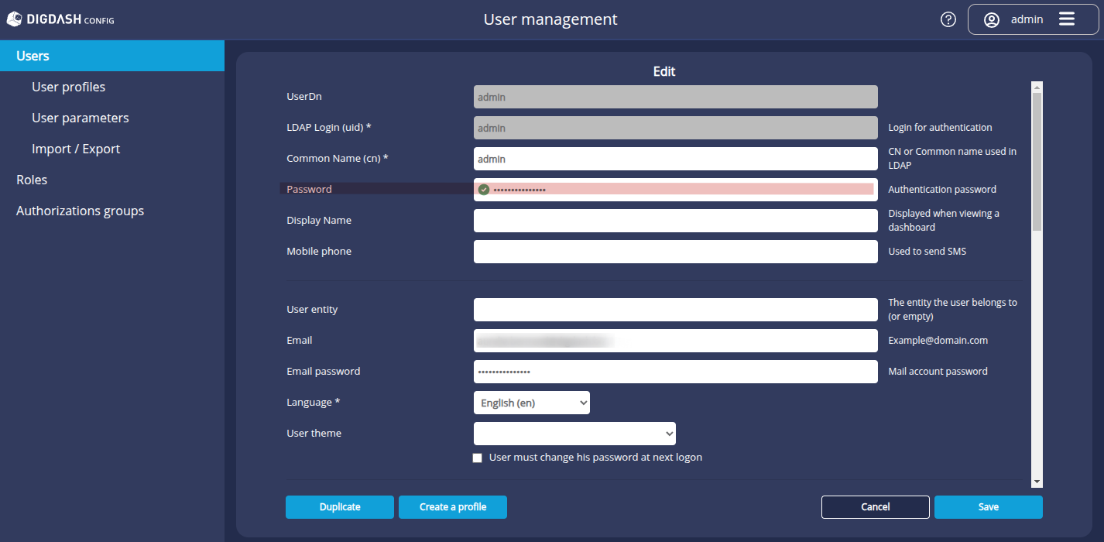
Creating the LDAP account
- Open Configuration -> User management -> Users.
- Create a new admin user and assign him all roles and authorizations groups.
- In the Password field, enter the new supervisor password defined above.
Database configuration
Audit data database
Open Configuration -> Server settings -> Databases -> Audit data and enter the URL, user and password.
URL : jdbc:mariadb://localhost:3306/default_ddaudit
This solution makes it possible to secure access to the audit database.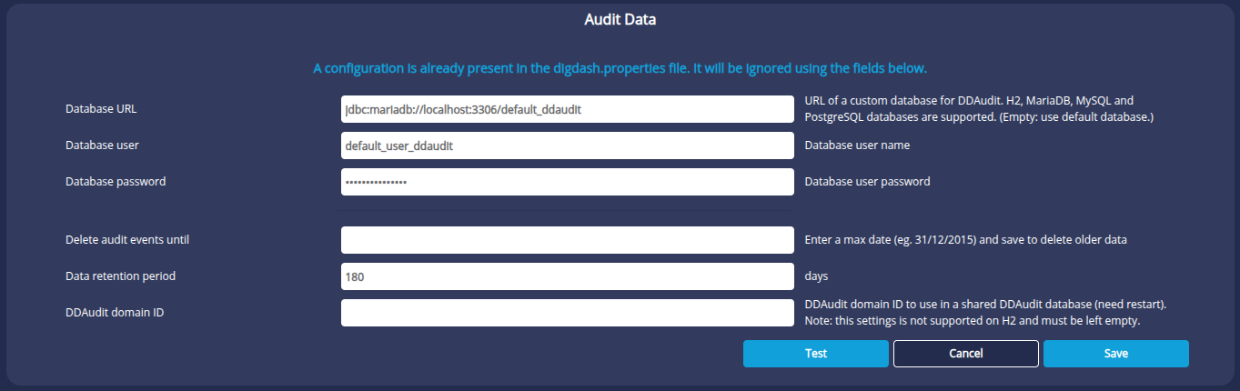
Comments database
Open Configuration -> Server settings -> Databases -> Audit data and enter the URL, user and password.
URL : jdbc:mariadb://localhost:3306/default_comment
This solution makes it possible to secure access to the comment database.

Data entry database
Open Configuration -> Server settings -> Databases -> Data entry and enter the URL, user and password.
Select the Enable data entry checkbox and select a database in the drop-down list below.

You must first have created a connection to the database from the Data connection manager in the Studio.
Enter default.user.ddentry for the user and password defined in the previous step.
The name defined in the Login Name field is the one that will appear in the database selection drop-down list.
DigDash Services
Open the Server status page : http://localhost:8080/ddenterpriseapi/serverstatus?adminDomain=adminconsole&serverDomain=ddenterpriseapi.
Check that the DigDash services are activated and that the maximum memory is well adapted to the capacity of the server, you must leave at least 4 GB for the system.
