OAuth
SMTP authentication via OAuth for sending email involves using the OAuth 2.0 protocol to secure access to the Google (smtp.gmail.com) or Microsoft SMTP server without the need to use a traditional password.
So instead of your email address and password, an OAuth access token is used to authenticate you to the SMTP server.
To configure OAuth, you need to retrieve your client credentials.
Once OAuth authentication has been configured, you can use it to configure your email server.
Obtaining client identifiers
OAuth authentication is available for Google and Microsoft.
Find out how to retrieve your client credentials below.
Google OAuth
In the case of Google, proceed as follows:
- Sign in to Google Console Cloud and create a new project.
- Open the project and go to API & Services > oAuth Consent Screen to configure the project.
- Then go to the Clients page from the navigation menu.
- Click Create Client.
- On the Create an OAuth Client ID page, complete the required fields:
- In the Application type field, select Web application.
- Enter a client name.
- In the Allowed forwarding URI section, click Add URI and enter the URI in the form:
http://localhost:8080/ddenterpriseapi/v2/oauth/redirect
- Click Create.
➡ The OAuth client is created. This gives you the client's identifier and secret code. - Copy them so that you have them for the DigDash configuration.
Microsoft OAuth
In the case of Microsoft, proceed as follows:
- Connect to the Azure Portal.
- In the navigation menu, go to Microsoft Entra ID(or Azure Active Directory).
- Click on Application Registrations and then on New Registration to create a new application.
- Fill in the required fields:
- Name: enter a name to identify your application (e.g. ddenterpriseapi).
- Supported account types: choose who will be able to connect:
- Accounts in this directory only(single tenant)
- Accounts in all directories(multi-tenant)
- Personal Microsoft accounts
- Redirection URI: add the authorised redirection URI, for example:
http://localhost:8080/ddenterpriseapi/v2/oauth/redirect
- Confirm by clicking Save.
- Once the application has been registered, retrieve your identifiers:
- Application ID (client): corresponds to Client ID.
- Directory ID (tenant): corresponds to the Microsoft tenant.
- In the left-hand menu, open Certificates and secrets, then click on New client secret.
- Give a description, choose a validity period, then click OK.
- Copy the generated secret immediately (it will not be displayed afterwards).
- This secret corresponds to the Client Secret.
In API Permissions, configure the permissions required for your application (e.g. User.Read, Mail.Read).
Some permissions may require administrator consent.
Configure OAuth authentication
Once you have retrieved your credentials, you can configure OAuth authentication. To do this
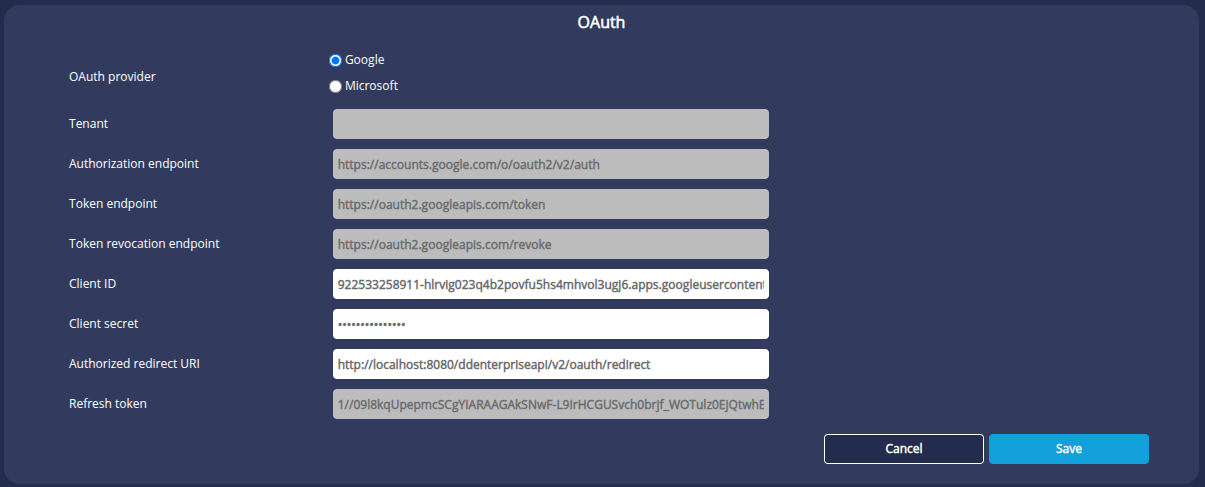
- Go to the Configuration > Server Parameters > Additional Paramaters> OAuth page.
- Select the OAuth Provider: Google or Microsoft.
- In the case of Microsoft, fill in the Tenant field with the directory ID (tenant) retrieved earlier.
- The URL fields are filled in by default and greyed out.
- Enter the Client ID and Client Secret obtained previously.
- In the Authorized redirect URI field, enter the URI in the form:
http://localhost:8080/ddenterpriseapi/v2/oauth/redirect - The Refresh token field will be filled in automatically once OAuth has been used for the email server.
- Click Save.
➡ You can now use OAuth for your email server.
See the page Email server page for more details.