
Using several servers in "Cluster" mode
- Installing DigDash Enterprise in "Cluster" mode
- Configuring the cluster
- Using multiple masters in a cluster
- Advanced parameters specific to clusters
- Using the cluster
To manage a larger volume of data (one billion lines), it is possible to use several servers in "Cluster" mode. Each server becomes a compute node in the cluster.
This brings together a master server and slave servers.
The master server is responsible for managing models, documents, roles, users and sessions, and for generating cubes and Flows (refresh). This is identical to a Digdash Enterprise server in standard single-machine mode.
Additional slave servers are only used to help flatten large data cubes interactively, when displaying flows, filtering, drills, etc.
There are two clustering architectures in DigDash Enterprise:
- Internal clustering: Described in this chapter
- Apache Ignite clustering : Apache Ignite Cluster Module
Installing DigDash Enterprise in "Cluster" mode
Prerequisites: several machines connected to each other via the network
Master server (on the most powerful machine in the cluster)
- Install DigDash Enterprise as standard (see Windows installation guide or Linux Installation Guide).
- Start the server as usual:
- On Windows: right-click on your service, then click Start from your Windows Services application.
- Linux: use the command sudo service tomcat9 start or sudo service tomcat10 start (depending on the version of tomcat installed).
Slave server (on each of the other machines in the cluster)
- Install DigDash Enterprise as standard (see Windows installation guide or Linux Installation Guide).
The difference is that a slave server does not need a licence to act as a computing unit for the cluster, nor an LDAP directory, nor the digdash_dasboard application whose war can be removed from Tomcat. - the server:
- Windows: right-click on your service, then click on Start from your Windows Services application.
- Linux: use the command sudo service tomcat9 start or sudo service tomcat10 start (depending on the version of Tomcat installed).
Configuring the cluster
To configure the cluster, repeat the following procedure on each server in the cluster:
- Using a browser, connect to the DigDash Enterprise main page (e.g. http://<server>:8080).
- Click on Configuration, then Server Settings.
- Log in as DigDash Enterprise administrator (admin/admin by default) to display the server settings page.
- Go to Servers -> Cluster settings.
- Fill in the various fields according to each server machine (see explanations below).
System performance section
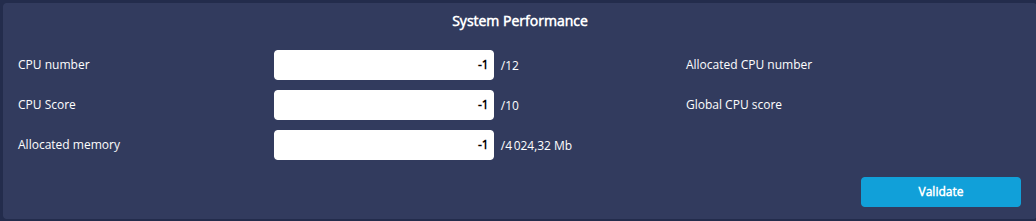
The System Performance section defines the capabilities of the current machine in the cluster. The CPU number, CPU Score and Allocated Memory parameters are used to distribute the computing load as evenly as possible.
- CPU number : the number of processors * number of cores on each processor. Potentially multiplied by a factor if the processors benefit from hyper-threading technology. Default -1, based on data returned by the operating system.
- CPU score : this is a score between 1 and 10 that puts the performance of one node in the cluster into perspective in relation to the others (in the case of a heterogeneous cluster). By default, -1 gives an average score (5).
- Allocated memory : the fraction of maximum memory authorised when the server is used as a computing unit. This value is less than or equal to the memory allocated to the Tomcat server. By default, -1 authorises all memory.
Authorized clusters section
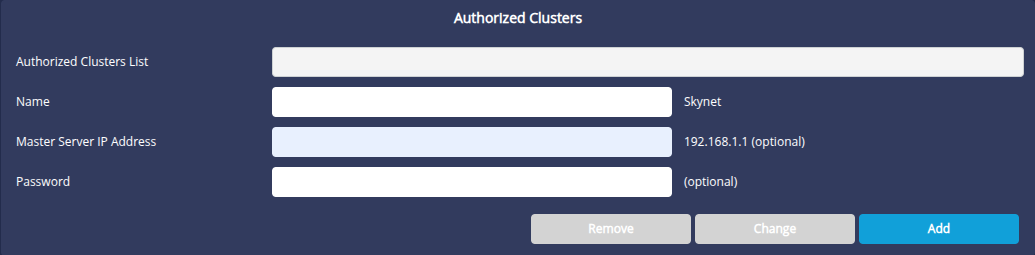
The Authorized clusters section allows you to specify whether the current machine can be used as a slave for one or more clusters, and if so which ones. One machine can be used by several DigDash Enterprise clusters. This section restricts its use as a slave to certain clusters only ( Selection list).
It is also in this section that we define the Password for the current server in the selected cluster. Without a password, the server cannot be a slave in this cluster.
To add a cluster authorised to use this slave server:
- Fill in the following fields:
- Name : cluster name (arbitrary)
- Master server IP address: IP address of the master server in the cluster authorised to use this server as a slave (e.g. http://192.168.1.1)
- Password: password of the slave in the context of the selected cluster
- Click the Add button to add this cluster to the list of authorised clusters
Cluster definition section
Only required for the Cluster Master server.
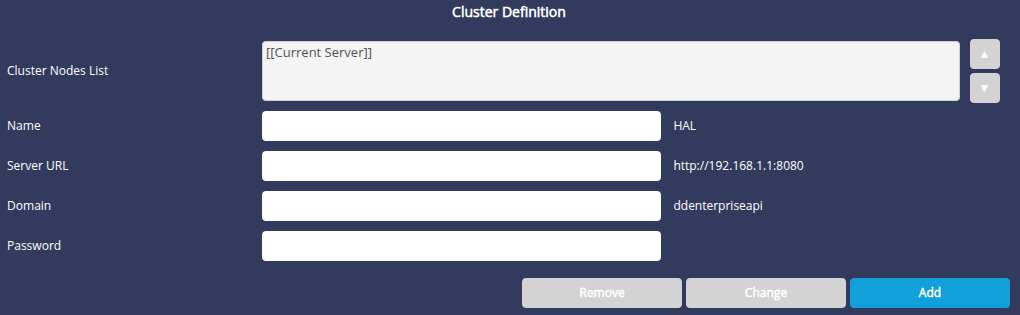
The Cluster Definition section only concerns the Cluster Master server. This is where we create a cluster by listing the cluster's slave servers and the master itself ( Cluster Nodes list, Name, Address, Domain and Password fields). The master server is implicitly the server via which you connected to this page.
To add a slave machine to the cluster
- Fill in the following fields:
- Name : slave machine name (arbitrary)
- Server URL: URL of the slave server (e.g. http://192.168.1.123:8080)
- Domain: DigDash Enterprise domain (by default ddenterpriseapi)
- Password: Slave password as you previously typed it when configuring the slave machine ( Authorized clusters section, Password field)
- Click the Add button to add this machine to your cluster.
Using multiple masters in a cluster
Some deployments require the use of several master servers within the same cluster. For example, in the case of an upstream HTTP load balancer that sends user sessions to one or other master machine. This mode is supported in DigDash by defining several identical clusters (one per master machine). The list of machines (Cluster Definition section) must be strictly identical for all cluster definitions. This is why it is possible to change the order of the machines in this list.
Example: We want to define a cluster consisting of two machines, A and B. Each of the two machines is the master and slave of the other.
We need to define not one but two clusters, A and B:
In the definition of cluster A :
- Current server: machine A (master of this cluster)
- machine B (slave of this cluster)
In the definition of cluster B :
- machine A (slave of this cluster)
- Current server: machine B (master of this cluster)
We can see that in cluster B, the master (B) is not the first machine in the list. What's important here is that the machine A, machine B list is the same on both clusters (whatever their function within their respective cluster).
Advanced parameters specific to clusters
File modified: system.xml
Example of XML syntax :
Available parameters:
- Name: CUBE_UPLOAD_MODE
Value: integer: 0, 1 or 2 (default: 1)
Description: Specifies whether cube shares should be downloaded from the master server to the slave servers when a user interacts with the cube (1), when the cube is generated by the master server (2), or never (0). See also the next chapter:"Using the cluster".
- Name: CLUSTER_TIMEOUT
Value: integer : (milliseconds, default: 30000)
Description: Specifies the timeout for all intra-cluster requests (between master and slaves), with the exception of the request to check the availability of a slave (see below).
- Name: CLUSTER_CHECK_TIMEOUT
Value: integer: (milliseconds, default: 5000)
Description: Specifies the timeout for the request to check the availability of a slave. This timeout is shorter to prevent the master from being blocked for too long if a slave is disconnected from the network.
Using the cluster
In a simple deployment in cluster mode, there is nothing more to do than what has been written above.
However, there are some interesting details that can help to improve the performance of a cluster.
The cluster is used according to the size of the data cube. Below a certain threshold, depending on the cube, the master machine and the slaves, the cluster may not be used. On the other hand, if the size of one or more data cubes becomes large, for example over several hundred million lines, they will be split into several parts and their calculation (flattening) will be distributed in parallel across all the available processors in the cluster to reduce the overall response time. This is done for each flattening of a large cube by a user of the dashboard, mobile, etc.
It should be noted that cube generation is the responsibility of the master server. Slaves are only involved in the interactive flattening of cubes that have already been generated (e.g. displaying a Flow, filtering, drilling, etc.).
Pieces of cubes are sent to the slaves on demand (if they don't already have them). This can slow down the system when the first flattening is requested by a user, particularly if the network bandwidth is low (< 1 gigabit).
However, there are various ways of avoiding this network congestion. Here are a few suggestions:
The first way is to place the cubes folder (sub-folder of Application Data/Enterprise Server/ddenterpriseapi by default) on a network drive accessible to all the machines in the cluster. For example, via a symbolic link (Linux, NFS). This link must be established for all machines in the cluster. The principle is that the master server will generate the cubes in this network folder, and when a user interacts with the system, master and slaves will all have a common view of the cubes. As disk cubes are only read once in the life cycle of a cube ( in-memory cube), the impact of the network folder on performance is negligible.
Another option is to use a third-party tool for automatically synchronising folders between several machines, which can copy the entire cube folder from the server, once it has been generated, to the slave machines. The principle is that the master server will generate the cubes in its local folder, then the synchronisation tool will copy this folder to all the slave machines. All this is done when the server is not active. Master and slaves will all have an identical view of the cubes.