
Installing Tomcat 9
Last modified by Aurelie Bertrand on 2026/03/19 11:40
This guide provides installation for Tomcat 9 on Windows.
Installing Tomcat 9
- Download TomCat 9 from https://tomcat.apache.org/download-90.cgi (Binary Distributions - > Core -> 32-bit/64-bit Windows Service Installer).
- Launch apache-tomcat-9.X.XX.exe.
- Accept the license agreement.
- In the Components list, select Tomcat (Service Startup & Native) and Start Menu Item.
- Leave the configuration settings at default.

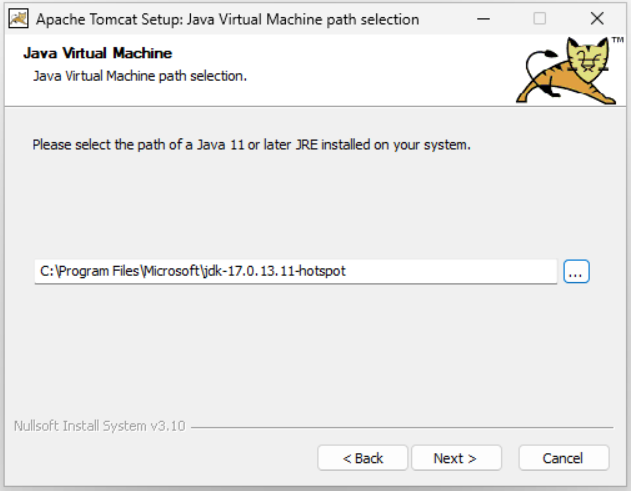
- Enter the path to the installation of the openjdk installed in step 1.
- Set the TomCat 9 installation directory.
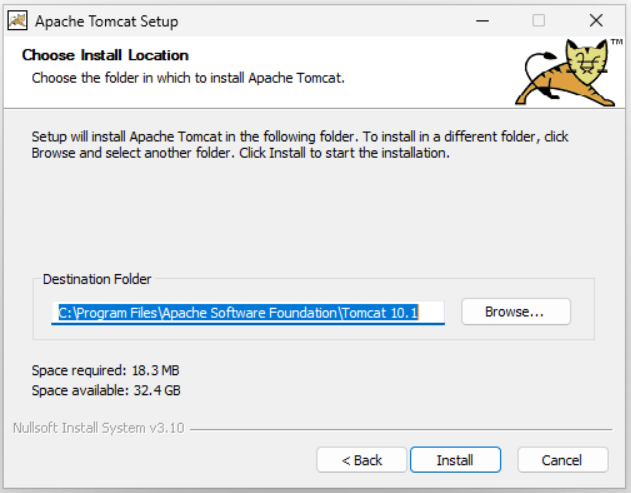
- Click Install to start TomCat 9 installation.
- Open page http://localhost:8080 to check TomCat is working properly.
- Open the TomCat 9 installation directory then the bin directory and launch tomcat9w.exe.
Modify the parameters contained in the Java tab :
 *
*- Adapt the paths to future digdash directories:
Ddigdash.properties.path=E:\digdash\digdash.properties
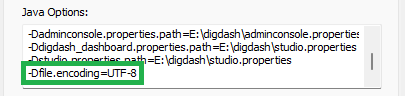
- To ensure that special characters are taken into account, add the parameter -Dfile.encoding=UTF-8 to the end of the JAVA_OPTS variable as below:
- Add the parameters --add-opens=java.base/java.nio=org.apache.arrow.memory.core,ALL-UNNAMED --add-opens=java.base/sun.security.ssl=ALL-UNNAMED --add-opens=java.base/sun.security.util=ALL-UNNAMED in Java 9 options.
- Adapt the paths to future digdash directories:
Editing the server.xml file
- Open the server.xml file located in the \Apache Software Foundation\Tomcat 9.0\conf directory.
<Connector port="8080" protocol="HTTP/1.1"
connectionTimeout="20000"
maxConnections="30000"
maxCParametersCount="100000"
maxThreads="10000" maxPostSize="62914560"
redirectPort="8443" compression="on" />
connectionTimeout="20000"
maxConnections="30000"
maxCParametersCount="100000"
maxThreads="10000" maxPostSize="62914560"
redirectPort="8443" compression="on" />
- Change the path of the webapps to deploy.
<Host name="localhost" appBase="E:/digdash/webapps/default"
unpackWARs="true" autoDeploy="true">
<Alias>digdash.client.com</Alias>
unpackWARs="true" autoDeploy="true">
<Alias>digdash.client.com</Alias>
- Add the log valve and then, the securing valve.
<Valve className="org.apache.catalina.valves.ErrorReportValve" showReport="false" showServerInfo="false" />
<Valve className="org.apache.catalina.valves.RemoteIpValve"
internalProxies="127\.0\.[0-1]\.1"
remoteIpHeader="X-Forwarded-For"
requestAttributesEnabled="true"
protocolHeader="X-Forwarded-Proto"
protocolHeaderHttpsValue="https"/>
<Valve className="org.apache.catalina.valves.RemoteIpValve"
internalProxies="127\.0\.[0-1]\.1"
remoteIpHeader="X-Forwarded-For"
requestAttributesEnabled="true"
protocolHeader="X-Forwarded-Proto"
protocolHeaderHttpsValue="https"/>
Editing the context.xml file
- Open the context.xml file located in the \Apache Software Foundation\Tomcat 9.0\conf directory.
- Add the following XML tag in the Context section:
<Resources cachingAllowed="true" cacheMaxSize="500000"/>