
Upgrade guide
- Introduction
- Best practices for version 2025 R1
- Upgrading DigDash Enterprise to version 2025 R1
- Upgrade procedure
- Step 1: Check the Java version used
- Step 2: Back up your configuration
- Step 3: Stop the server
- Step 4: Backup and delete old applications
- Step 5: Copy the new applications
- Step 6: Recover the add-ons
- Step 7: Modify the JAVA_OPTS variable
- Step 8: Restart the server
- Step 9: Restore
- Step 10: Clean the browser cache
- Step 11: Regenerate data models
- Step 12: Reset default Authorization groups
- Step 13: Modify the Dashboard theme
- Behavioural changes
- Upgrade procedure
- Deploying a patch on a 2025 R1
Introduction
This guide describes the procedure and precautions to be taken to update your DigDash Enterprise version to the new 2024 R2 version.
Please consult page Behaviour changes to know about the behavioural changes introduced in this version.
This guide is relevant to you ONLY if you follow the good practices described in the dedicated paragraph.
If this is not the case, start the installation from scratch according to the Linux or Windows.
There are different DigDash Enterprise installation archives for Tomcat 9 and Tomcat 10. They are named as follows:
- For Tomcat 9: digdash_enterprise_2025R1_64.zip ou digdash_enterprise_2025R1_numpatch_64.zip.
- For Tomcat 10: digdash_enterprise_2025R1_t10_64.zip ou digdash_enterprise_2025R1_numpatch_t10_64.zip.
After extraction, the folder will be called :
- For Tomcat 9: digdash_enterprise_2025R1_64 ou digdash_enterprise_2025R1_numpatch_64.
- For Tomcat 10: digdash_enterprise_2025R1_t10_64 ou digdash_enterprise_2025R1_numpatch_t10_64.
To clarify the procedure, the installation folder for the oldest version will be named install_dd_OLD and the installation folder for the most recent version will be named install_dd_NEW.
The version number can be seen at the bottom of the DigDash home page (or in the version.txt file in the archive).
Supported configuration :
- Server: Tomcat 9 (Windows and Linux: Ubuntu 20.02 and 22.02)
Tomcat 10 (Windows and Linux: Ubuntu 24.04). - Server: Java 17 only (Windows and Linux)
Best practices for version 2025 R1
For optimum performance of DigDash Enterprise, we recommend that you apply the following recommendations:
- Use the digdash.properties file to store the configuration of the environments.
For more information on setting the parameters of the file, see the page Configuring the digdash.properties file. - Use of an external database system for the DDAudit, Comments and DDDataEntry databases.
For more information on installing an external database system, see :- Installing MariaDB for a Windows production environment.
- Installing MariaDB for an Ubuntu production environment.
- Use of a Tomcat separate from the Digdash installation (installation via the OS package manager).
For more information on installing a separate Tomcat, see the section :- Installing Tomcat 9 or Tomcat 10 for a Windows production environment.
- Installing Tomcat 9 for an Ubuntu 20.02 or 22.02 production environment.
- Installing Tomcat 10 for an Ubuntu 24.04 production environment.
- Using OpenDJ instead of adswrapper.
For more information on installing OpenDJ, see :- Installing OpenDJ for a Windows production environment.
- Installing OpenDJ for an Ubuntu production environment.
Upgrading DigDash Enterprise to version 2025 R1
This paragraph applies to you if you are upgrading DigDash Enterprise from version 2023 R2 or later to version 2025 R1.
If you are upgrading from a version earlier than 2023 R2, please contact DigDash at the following address contact@digdash.com.
Upgrade procedure
Step 1: Check the Java version used
Java 17 is mandatory since DigDash 2024 R2. To check the version currently used by tomcat, you can :
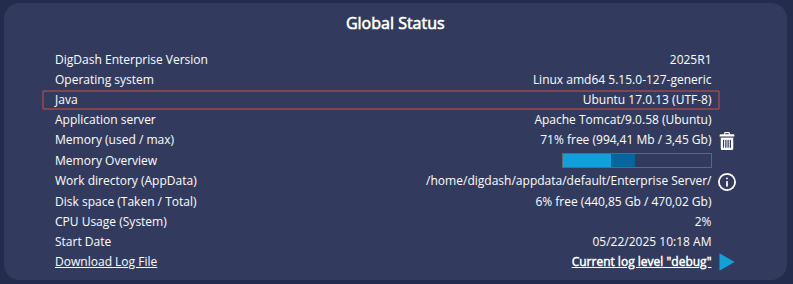
- Open the page Server Status: the Java version in use is indicated in the General Status section (in this case Java 17).
- Check the version by going to the Java directory:
- In a terminal, enter the following command:
ll
- Look at which version the default-java symbolic link is currently pointing to.
In the example below, it is pointing to java 11.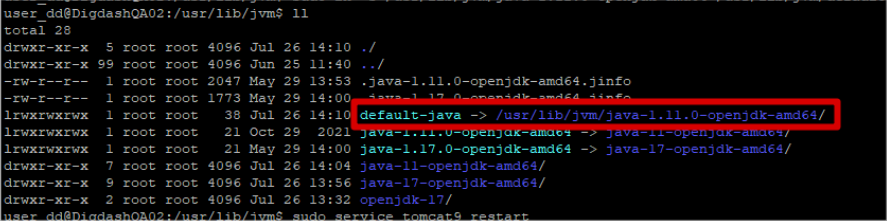
If the version used is not Java 17, consult the page Changing the Java version page to find out how to change version.
Step 2: Back up your configuration
Make a full backup of your configuration: LDAP entries (users, roles, authorisation groups), data models, dashboards, etc.
If you have added files to your installation (modification of logos, images, css, addition of JSPs, etc.), you will need to carry them over to the new installation.
Step 3: Stop the server
Stop the DigDash server:
- Windows: right-click on your service, then click on Stop from your Windows Services application.
- Linux: use the command sudo service tomcat9 stop or sudo service tomcat10 stop
(depending on the version of tomcat installed)
Step 4: Backup and delete old applications
Back up and then delete the files and folders in <install_dd>/webapps:
Folders :
| Files :
|
Step 5: Copy the new applications
Unzip the new version of the product into a temporary location.
Navigate in this temporary folder to the webapps folder .
Copy the following files to the same folder in your installation:
- adminconsole.war
- ddenterpriseapi.war
- digdash_dashboard.war
- studio.war
- adswrapper.war (not recommended)
The webapps folder should now contain 4 .war files (5 if you use adswrapper) and the ROOT folder.
Step 6: Recover the add-ons
Copy the contents of the add-ons directory to the same location in your installation.
If you have modified certain files (importtools, backtuptools, etc.), save them before copying.
Step 7: Modify the JAVA_OPTS variable
A parameter must be added to the JAVA_OPTS variable.
On Linux
- Edit the following file:
sudo vi /etc/default/tomcat9or sudo vi /etc/default/tomcat10
depending on your version of tomcat.
- Add the parameters -Dfile.encoding=UTF-8 and --add-opens=java.base/java.nio=ALL-UNNAMED --add-opens=java.base/sun.security.ssl=ALL-UNNAMED --add-opens=java.base/sun.security.util=ALL-UNNAMED to the JAVA_OPTS variable to obtain the following result:
On Windows
- Go to the Tomcat installation directory, then to the bin directory and run tomcat9w.exe or tomcat10w.exe depending on your version of Tomcat.
- Go to the Java tab.
- Add the parameter -Dfile.encoding=UTF-8 in Java options as follows:
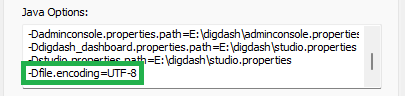
- Add the parameters --add-opens=java.base/java.nio=org.apache.arrow.memory.core,ALL-UNNAMED --add-opens=java.base/sun.security.ssl=ALL-UNNAMED --add-opens=java.base/sun.security.util=ALL-UNNAMED in Java 9 options.
Step 8: Restart the server
Restart the DigDash server:
- On Windows: right-click on your service, then click on Start from your Windows Services application.
Linux: use the command sudo service tomcat9 start or sudo service tomcat10 start
(depending on the version of tomcat installed)
and let Tomcat redeploy the new applications.
On Linux, refer to the Linux Installation Guide.
On Windows, refer to the Windows Installation Guide.
Step 9: Restore
If you have configured your new installation to point to your old data folder AND your old LDAP, restoration is not necessary.
If you are pointing to a new data folder, use the backup from step 2 to restore the data files (templates, portfolios, dashboards, etc).
Similarly, if you are pointing to a new LDAP folder, restore the LDAP entries (users, roles, authorisation groups),
Step 10: Clean the browser cache
Delete the browser cache (shortcut on most browsers: Ctrl + Shift + Delete).
Step 11: Regenerate data models
The EVENT_REFRESHFLOW_FORCEALL event refreshes all flows in the system (except disabled flows) and forces regeneration of all cubes.
- Enter the URL in the following form in the browser to call this event via fireevent.
http://localhost:8080/ddenterpriseapi/fireevent?eventid=EVENT_REFRESHFLOW_FORCEALL
Step 12: Reset default Authorization groups
New authorizations have been added in version 2025 R1. It is necessary to reset the authorizations groups provided by DigDash for them to be properly implemented.
Step 13: Modify the Dashboard theme
Several changes have been made to the Dashboard theme in version 2024 R2:
- A new digdash_2024 theme is now available.
- The digdash_2019 theme has been modified following internal changes to the Dashboard and must be reset to avoid any problems displaying graphs and dashboards.
- The digdash theme has been removed.
Follow the instructions according to your situation.
Changing to the new digdash_2024 theme
If you wish to use the new digdash_2024 theme as your server theme:
- Go to Configuration -> Server settings -> Additional settings -> Miscellaneous.
- In the Theme drop-down list, select digdash_2024.
Using the digdash_2019 theme
If you are using the digdash_2019 theme (without customisation), you need to reset the theme. To do this
- From the Studio, open the Styles Manager.
- Right-click on the digdash_2019 theme and then click on Reset.
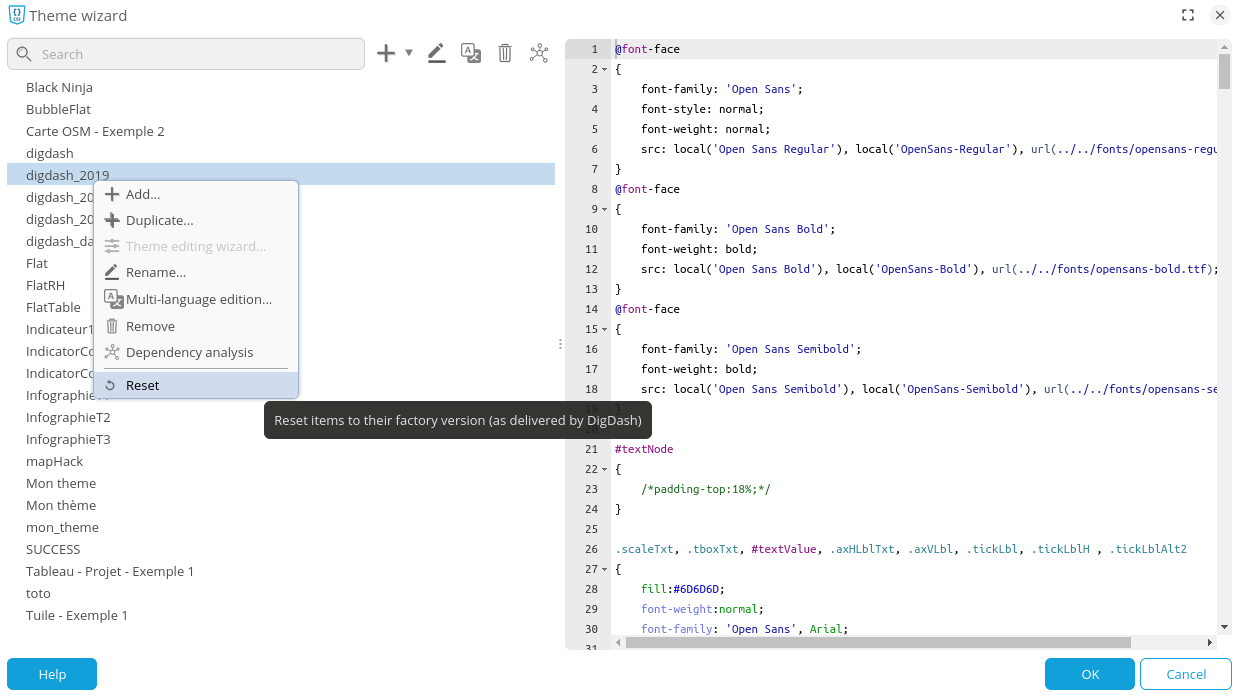
- Click on OK.
- Go to Configuration -> Server settings -> Additional settings -> Miscellaneous to check that the digdash_2019 theme is selected as the server theme.
Using a custom digdash_2019 theme
If you are using a custom digdash_2019 theme:
- Retrieve the changes/additions made inside the stylesheet and save them separately.
- Reset the digdash_2019 theme as described in the previous paragraph.
- Create a new custom theme by following the theme variabilisation best practice. See page Customising the dashboard theme for a detailed description.
- Re-apply the changes/additions to the style sheet.
- Go to Configuration -> Server settings -> Additional settings -> Miscellaneous to select the new custom theme as your server theme.
Using the digdash theme
The digdash theme has been removed. If you were using the digdash theme , you can:
- select the digdash_2024 theme : see the paragraph Switching to the new digdash_2024 theme.
- select the digdash_2019 theme: see the paragraph Using the digdash_2019 theme.
- create a new custom theme: see Customising the dashboard theme.
Behavioural changes
New features or bug fixes in 2025 R1 can lead to changes in behaviour that are likely to have an impact. We therefore recommend that you consult the list of behavioural changes available on the dedicated page: Behaviour changes.
Deploying a patch on a 2025 R1
This paragraph concerns updating a 2025 R1 version to a more recent 2025 R1 version.
It is assumed that your configuration follows the recommendation to use the digdash.properties file. If you have not done so, please refer to the paragraph Best practices for version 2025 R1.
The procedure for deploying a patch is now the same as for updating a version. You can therefore follow the procedure detailed above.