Guide d'installation Linux
Vous trouverez dans ce guide les instructions d'installation et de configuration dans un environnement de production sur Ubuntu 20.04 et Ubuntu 22.04.
- Versions supportées
- Digdash
- OpenDJ
- MariaDB (Préconisé)
- NGINX (Optionnel)
- Configuration DigDash après installation
Ce document décrit comment installer DigDash sur Linux.
Pour l'installation sur Windows, se reporter au document Guide d'Installation Windows.
Pour une mise à jour d'une installation existante, se reporter au document Guide de mise à jour.
Versions supportées
Les versions supportées sont les suivantes :
- Tomcat 9 : dernier patch
- OpenDJ : version 4.8.0 et ultérieure
- MariaDB : version de l'OS ou dernière version LTS dernier patch
- Nginx : version du système
Digdash
OpenJDK
sudo apt install openjdk-17-jdk
# Vérifier l'installation
java -version
Tomcat 9
Installation
Création de l'arborescence
sudo mkdir -p /home/digdash/webapps/default/
# Répertoire de travail
sudo mkdir -p /home/digdash/appdata/default/
# Emplacement fichier .properties
sudo mkdir -p /etc/digdash/
# Emplacement des logs
sudo mkdir -p /var/log/digdash/
Modification des droits sur les dossiers
sudo chown -R tomcat:tomcat /var/log/digdash
sudo chmod a+w /var/log/digdash
Configuration du server.xml
Emplacement : /etc/tomcat9/server.xml
Emplacement des webapps
<Host name="localhost" appBase="webapps"
# par celle ci
<Host name="localhost" appBase="/home/digdash/webapps/default"
Valve Connector
<Connector port="8080" protocol="HTTP/1.1"
connectionTimeout="20000"
redirectPort="8443" ></Connector>
# comme suit
<Connector port="8080" protocol="HTTP/1.1"
connectionTimeout="20000"
maxConnections="30000"
maxParameterCount="100000"
maxThreads="10000" maxPostSize="62914560"
redirectPort="8443" compression="on" ></Connector>
Valve Reverse Proxy
<Valve className="org.apache.catalina.valves.RemoteIpValve"
internalProxies="127\.0\.[0-1]\.1"
remoteIpHeader="X-Forwarded-For"
requestAttributesEnabled="true"
protocolHeader="X-Forwarded-Proto"
protocolHeaderHttpsValue="https"></Valve>
Dans le cas d'un serveur en ipv6, utilisez :
internalProxies="127\.0\.[0-1]\.1|0:0:0:0:0:0:0:1|::1"
remoteIpHeader="X-Forwarded-For"
requestAttributesEnabled="true"
protocolHeader="X-Forwarded-Proto"
protocolHeaderHttpsValue="https"></Valve>
Valve Log
<Valve className="org.apache.catalina.valves.ErrorReportValve" showReport="false" showServerInfo="false" ></Valve>
Limiter le fichier localhost_access_log (optionnel)
Pour limiter la taille du fichier localhost_access_log, ajouter le paramètre maxDays dans la valve Access Log et lui donner la valeur du nombre de jours de votre choix.
<Valve className="org.apache.catalina.valves.AccessLogValve" directory="logs"
prefix="localhost_access_log" suffix=".txt"
pattern="%h %l %u %t "%r" %s %b" maxDays="10" ></Valve>
Modification du context.xml
Emplacement : /etc/tomcat9/context.xml
<Resources cachingAllowed="true" cacheMaxSize="100000"></Resources>

Modification de la RAM
sudo vi /etc/default/tomcat9
# Remplacer la variable JAVA_OPTS existante par
JAVA_OPTS="-Djava.awt.headless=true -XX:+UseShenandoahGC -Xms6G -Xmx6G -Djava.security.egd=file:/dev/urandom -Dfile.encoding=UTF-8 -DPROP_MAX_CONCURRENT_TOTAL=5000 -DPROP_MAX_CONCURRENT_CON_PER_HOST=5000"
# Changer le paramètre 6G en fonction de la capacité de la machine en laissant au minimum 2G pour l OS.
# Dans l'exemple ci-dessus, la machine dispose de 8G de RAM.
# Il est recommandé d'utiliser la même valeur pour Xms et Xmx.
Activation de l'autorisation d'écriture des logs par tomcat
sudo mkdir -p /etc/systemd/system/tomcat9.service.d
# Créer le fichier
sudo vi /etc/systemd/system/tomcat9.service.d/logging-allow.conf
# Ajouter les lignes suivantes
[Service]
ReadWritePaths=/var/log/digdash/ /home/digdash/
#recharger la configuration des "daemon"
sudo systemctl daemon-reload
sudo systemctl restart tomcat9.service
Activation du lancement automatique du service au démarrage
Déploiement de Digdash Version 24R1
Fichiers properties
Placer le fichier digdash.properties (contenu à la racine du dossier dézippé) dans le dossier /etc/digdash.
Créer les fichiers suivants dans le dossier /etc/digdash :
Modifier le fichier digdash.properties précédemment copié
# Emplacement des logs
ddenterpriseapi.ddlog4j.properties.file=/etc/digdash/log4j2_api.properties
studio.ddlog4j.properties.file=/etc/digdash/log4j2_studio.properties
digdash_dashboard.ddlog4j.properties.file=/etc/digdash/log4j2_dash.properties
# Emplacement du appadata
ddenterpriseapi.AppDataPath=/home/digdash/appdata/default
digdash_dashboard.AppDataPath=/home/digdash/appdata/default
studio.AppDataPath=/home/digdash/appdata/default
adswrapper.ads.instance.name=/home/digdash/appdata/default/ldapdigdash
adminconsole.adminconsole_domain=adminconsole
adminconsole.webstudio_domain=studio
adminconsole.server_domain_list=ddenterpriseapi
adminconsole.dashboard_domain=digdash_dashboard
studio.DOMAIN=ddenterpriseapi
studio.FORCEDOMAIN=true
studio.SERVERURL=http://localhost:8080
studio.FORCESERVERURL=true
studio.adminconsole_domain=adminconsole
digdash_dashboard.DOMAIN=ddenterpriseapi
digdash_dashboard.FORCEDOMAIN=true
digdash_dashboard.SERVERURL=http://localhost:8080
digdash_dashboard.FORCESERVERURL=true
digdash_dashboard.adminconsole_domain=adminconsole
########### Nettoyage automatique des fichiers programmé
########### Scheduled automatic file cleaning
ddenterpriseapi.startCleaner=true
########### Nettoyage des fichiers inutilisés au démarrage du serveur
########### Clean up unused files on server startup
ddenterpriseapi.cleanOnStart=false
########### Sauvegarde automatique programmée
########### Scheduled automatic backup
ddenterpriseapi.autoBackup=true
ddenterpriseapi.autoBackupKeepDays=7
digdash_dashboard.CANCHANGEPASSWORD=true
Emplacement des war
Placer les éléments suivants (contenu dans le répertoire apache_tomcat/webappps du dossier dézippé) dans le dossier /home/digdash/webapps/default :
- adminconsole.war
- ddenterpriseapi.war
- digdash_dashboard.war
- studio.war
- le dossier ROOT/
OpenDJ
Installation
- Commencer par récupérer la dernière version du fichier opendj-4.x.x_all.deb sur le site https://github.com/OpenIdentityPlatform/OpenDJ/releases :
- Lancer l’installation :
Paramétrage initial
Afin de simplifier le paramétrage d'OpenDJ, nous allons créer un fichier “setupOpenDJ.props” contenant les options disponibles pour répondre à l'utilitaire "setup" d’OpenDJ (cela permet d'éviter l’interface de paramétrage).
Le contenu de ce fichier est détaillé ci-dessous :
# Sample properties file to set up OpenDJ directory server
# See OpenDJ Setup command man for more options
#
rootUserDN =cn=Directory Manager
rootUserPassword =adminOpenDJ1
hostname =localhost.localdomain
ldapPort =389
adminConnectorPort =4444
backendType =je
baseDN =dc=digdash,dc=com
addBaseEntry =true
ldapsPort =636
enableStartTLS =false
generateSelfSignedCertificate =true
start =true
#sampleData =2000
Après avoir enregistré le fichier, exécuter la ligne de commande suivante :
Paramétrage supplémentaire
- Se placer dans le répertoire d’installation d’OpenDJ :
Les fichiers LDIF peuvent être téléchargés en cliquant sur le lien suivant .
- Créer les organisations grâce au fichier “neworganisation.ldif” ci-dessous :
objectClass: organizationalUnit
ou: default
- Définir le vérificateur de mot de passe "Custom Character-set Password Validator":
- Créer le second vérificateur de mot de passe "Custom length Password Validator":
- Appliquer les deux vérificateurs de mot de passe :
- Définir la politique de mot de passe pour les utilisateurs grâce au fichier “ppolicy.ldif” ci-dessous :
objectClass: top
objectClass: subentry
objectClass: pwdPolicy
cn: ppolicy
pwdAttribute: userPassword
pwdAllowUserChange: TRUE
pwdCheckQuality: 1
pwdExpireWarning: 600
pwdFailureCountInterval: 30
pwdGraceAuthNLimit: 5
pwdInHistory: 5
pwdLockout: TRUE
pwdLockoutDuration: 900
pwdMaxAge: 0
pwdMaxFailure: 5
pwdMinAge: 0
pwdMustChange: FALSE
pwdSafeModify: FALSE
subtreeSpecification: {base "ou=users", specificationFilter "!(uid=admin)" }
- Définir une seconde politique de mot de passe pour l’admin grâce au fichier “ppolicy-admin.ldif” ci-dessous :
objectClass: top
objectClass: subentry
objectClass: pwdPolicy
cn: ppolicy-admin
pwdAttribute: userPassword
pwdAllowUserChange: TRUE
pwdCheckQuality: 1
pwdFailureCountInterval: 30
pwdGraceAuthNLimit: 5
pwdInHistory: 5
pwdLockout: FALSE
pwdMaxAge: 0
pwdMinAge: 0
pwdMustChange: FALSE
pwdSafeModify: FALSE
subtreeSpecification: {base "ou=users", specificationFilter "(uid=admin)" }
- Modifier la politique de mot de passe pour autoriser les mots de passe pré-encodés (utiles pour les restaurations dans Digdash) :
- Créer un utilisateur admin pour digdash via le fichier “create_user_admin.ldif” ci-dessous :
objectClass: shadowAccount
objectClass: inetOrgPerson
cn: Admin Domain Default
sn: Default
uid: admin_default
- Lui affecter les droits nécessaires en utilisant les fichiers “add_admin_right.ldif” et “add_admin_right2.ldif” ci-dessous :
changetype: modify
add: aci
aci: (target ="ldap:///ou=default,dc=digdash,dc=com")(targetattr = "userpassword || shadowlastchange")(version 3.0; acl "allow write on userpassword and shadowlastchange for admin"; allow(write) (userdn = "ldap:///uid=admin,ou=default,dc=digdash,dc=com");)
aci: (target ="ldap:///ou=default,dc=digdash,dc=com")(targetattr = "userpassword || shadowlastchange")(version 3.0; acl "allow read,write on userpassword and shadowlastchange for auth users"; allow(read) (userdn = "ldap:///all");)
aci: (target ="ldap:///ou=default,dc=digdash,dc=com")(targetattr = "userpassword || shadowlastchange")(version 3.0; acl "allow read on userpassword and shadowlastchange for anonymous"; allow(selfwrite) (userdn = "ldap:///anyone");)
aci: (target ="ldap:///ou=default,dc=digdash,dc=com")(targetattr = "*")(version 3.0; acl "allow write on * for admin"; allow(all) (userdn = "ldap:///uid=admin,ou=default,dc=digdash,dc=com");)
aci: (target ="ldap:///ou=default,dc=digdash,dc=com")(targetattr = "*")(version 3.0; acl "allow read on * for anonymous"; allow(read) (userdn = "ldap:///all");)
changetype: modify
add: ds-privilege-name
ds-privilege-name: config-read
ds-privilege-name: password-reset
ds-privilege-name: unindexed-search
- Générer un mot de passe pour l’administrateur et le conserver en mémoire pour plus tard :
Activation du lancement automatique du service au démarrage
- Créer le fichier opendj.service :
- Et y coller les lignes suivantes :
Description=OpenDJ Server Daemon
Wants=network-online.target
After=network-online.target
Conflicts=shutdown.target
[Service]
Type=simple
Restart=no
TimeoutSec=5min
IgnoreSIGPIPE=no
KillMode=process
GuessMainPID=no
RemainAfterExit=yes
ExecStart=/opt/opendj/bin/start-ds --quiet
ExecStop=/opt/opendj/bin/stop-ds --quiet
[Install]
WantedBy=multi-user.target
- Ensuite taper les commandes suivantes :
systemctl enable --now opendj
systemctl status opendj
Fonction utile
L'opération ci-dessous ne fait pas partie de l'installation.
Il peut néanmoins être utile de la connaître pour une utilisation ultérieure.
Étendre la limite pour les recherches LDAP
Étendre la limite de recherche du LDAP à plus de 1000 utilisateurs avec le fichier “extend_search_limit.ldif” ci-dessous :
changetype: modify
add: ds-rlim-size-limit
ds-rlim-size-limit: 10000
MariaDB (Préconisé)
La base de données MariaDB va servir à stocker les éléments suivants : Commentaires, données d'audit et formulaires de saisies.
Cette base est plus pérenne qu'une base H2 c'est pourquoi nous préconisons son utilisation. Si vous possédez déjà une base de données sur laquelle Digdash peut écrire et lire alors passez à l'étape de configuration.
Cela fonctionne aussi avec Mysql ou Postgresql.
Installation
sudo systemctl start mariadb
#Arrêt de mariadb
sudo systemctl stop mariadb
#Reload pour prise en compte de modification de configuration
sudo systemctl reload mariadb
sudo systemctl force-reload mariadb
#Connaître la version
mariadb --version
Lancer mysql_secure_installation, cela va permettre de sécuriser l'installation
# Répondez oui à toutes les étapes
Activation du lancement automatique du service au démarrage
Configuration côté base de données
Nous allons créer une base pour chaque domaine et chaque webapps (par exemple prod_ddaudit et dev_ddaudit et ainsi de suite)
Dans l'exemple ci dessous, nous allons considérer qu'il n'existe qu'un environnement 'default'.
sudo mariadb -u root -p
# Créer toutes les bases de données nécessaires domaine_module.
CREATE DATABASE default_ddaudit;
CREATE DATABASE default_comment;
CREATE DATABASE default_ddentry;
# Créer un user pour chaque base de données domaine_user_module. Le mot de passe est un nouveau mot de passe à créer.
CREATE USER 'default_user_ddaudit'@'localhost' IDENTIFIED BY 'mynewpassword';
CREATE USER 'default_user_comment'@'localhost' IDENTIFIED BY 'mynewpassword';
CREATE USER 'default_user_ddentry'@'localhost' IDENTIFIED BY 'mynewpassword';
# Attribuer les droits aux utilisateurs sur les bonnes bases
GRANT ALL PRIVILEGES ON default_comment.* TO 'default_user_comment'@'localhost';
GRANT ALL PRIVILEGES ON default_ddaudit.* TO 'default_user_ddaudit'@'localhost';
GRANT ALL PRIVILEGES ON default_ddentry.* TO 'default_user_ddentry'@'localhost';
NGINX (Optionnel)
Nous utilisons Nginx comme reverse proxy.
Installation
Activation du lancement automatique du service au démarrage
Configuration
Créer le fichier de configuration portant le nom de votre machine ou de votre environnement. Dans cet exemple, on utilise 001-digdash.
Dans le dossier /etc/nginx :
sudo vi /etc/nginx/sites-available/001-digdash.conf
# Remplacer .mondomaine.com pour server et les chemins Certificate(s) and private key, par vos informations.
upstream backend_tomcat{
least_conn;
server localhost:8080 fail_timeout=0;
}
server {
listen [::]:80;
listen 80;
server_name *.mondomaine.com;
# Redirect all non-https requests
rewrite ^ https://$host$request_uri? permanent;
error_log /var/log/nginx/digdash.com.error_log warn;
access_log /var/log/nginx/digdash.com.access.log;
}
server {
listen [::]:443 ssl http2 default_server;
listen 443 ssl http2 default_server;
server_name *.mondomaine.com;
client_max_body_size 4G;
proxy_read_timeout 300;
proxy_connect_timeout 300;
proxy_send_timeout 300;
error_log /var/log/nginx/digdash.com.error_log warn;
access_log /var/log/nginx/digdash.com.access.log;
# Certificate(s) and private key
ssl_certificate_key /emplacement/de/la/clé/macle.key;
ssl_certificate /emplacement/du/certificat/moncertif.crt;
#DigDash Management SSL
include digdash_ssl_params;
location / {
include proxy_params;
rewrite ^(/digdash_dashboard.*)/index.html(.*)$ $1/index.jsp permanent;
rewrite ^(/digdash_dashboard.*)/index-editor.jsp(.*)$ $1/index-editor.html permanent;
proxy_intercept_errors on;
proxy_pass http://backend_tomcat;
proxy_cookie_path ~^/(.+)$ "/$1; HTTPOnly; Secure;samesite=none;";
}
}
Puis créer un lien symbolique dans site enabled
Créer le fichier digdash_ssl_params contenant la politique de securité.
# openssl dhparam 4096 -out /etc/ssl/dhparam.pem
#ssl_dhparam /etc/ssl/dhparam.pem;
ssl_protocols TLSv1.3 TLSv1.2;
ssl_prefer_server_ciphers on;
ssl_ecdh_curve secp521r1:secp384r1;
ssl_ciphers EECDH+AESGCM:EECDH+AES256;
ssl_session_cache shared:TLS:2m;
ssl_buffer_size 4k;
# OCSP stapling
ssl_stapling on;
ssl_stapling_verify on;
resolver 1.1.1.1 1.0.0.1 [2606:4700:4700::1111] [2606:4700:4700::1001]; # Cloudflare
# Set HSTS to 365 days
add_header Strict-Transport-Security 'max-age=31536000; includeSubDomains; preload' always;
Configuration DigDash après installation
Lancement de Digdash
- Redémarrer le service Tomcat.
- Vérifier le déploiement des war dans le dossier d’installation home/digdash/webapps/default.
- Accéder à DigDash sur l’adresse suivante : http://localhost:8080/adminconsole.
Le login / mot de passe sera admin / admin.
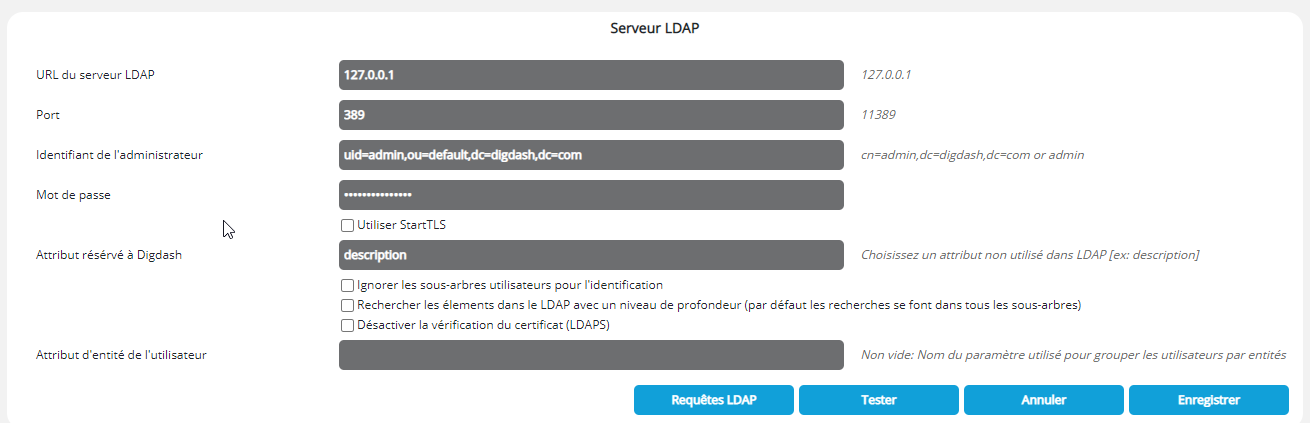
Branchement de Digdash au serveur OpenDJ installé
Aller dans Configuration -> Paramètres serveur-> Serveurs -> LDAP.
- Port : 389
- Utilisateur : uid=admin,ou=default,dc=digdash,dc=com
- Mot de passe : mot de passe admin de OpenDJ
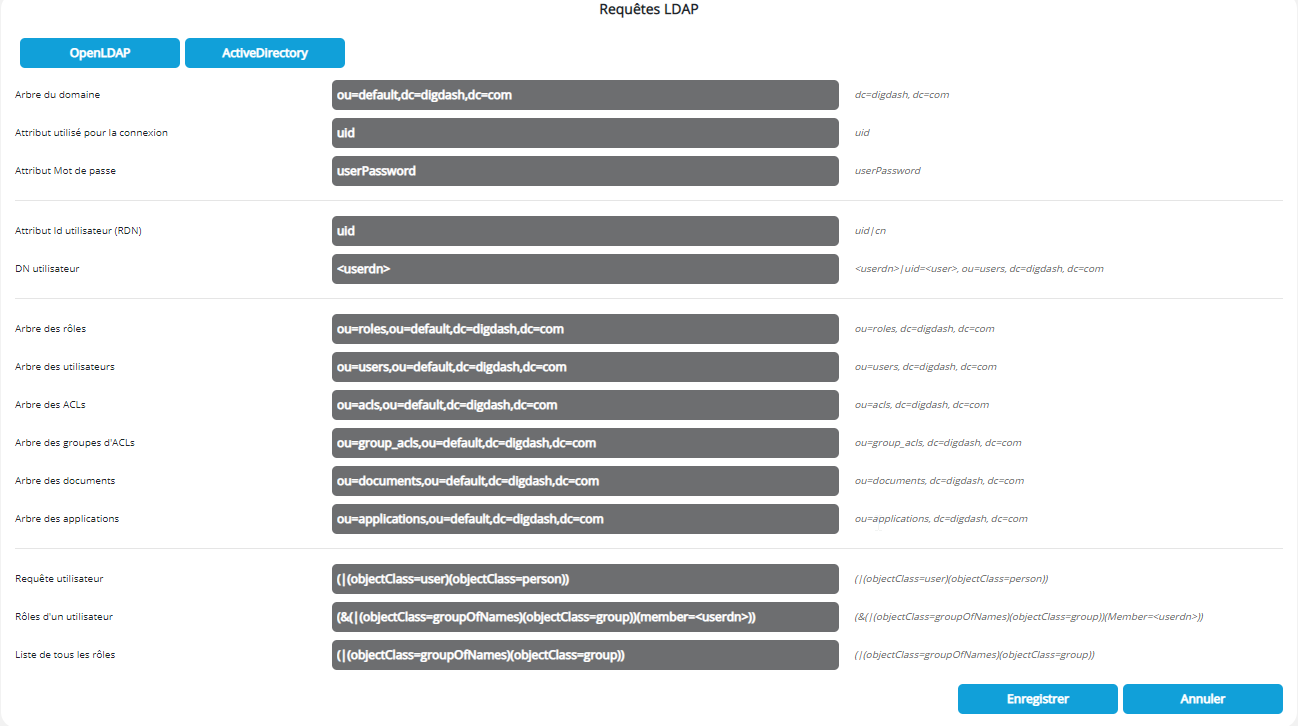
Cliquer ensuite sur Requêtes LDAP, et entrer "ou=default" dans le champ Arbre du domaine pour que les champs soient automatiquement renseignés comme ci-dessous.
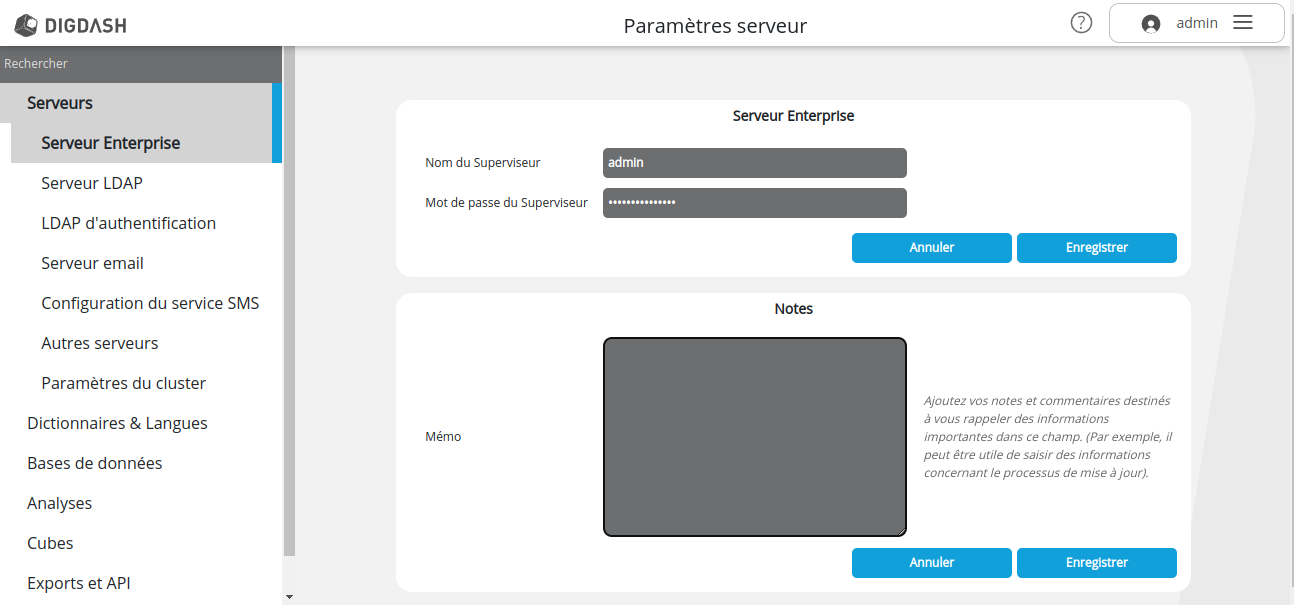
Modification du mot de passe superviseur et création du compte LDAP
Modification du mot de passe superviseur
Aller dans Configuration -> Paramètres serveur > Serveurs -> Serveur Enterprise et entrer un nouveau mot de passe dans le champ Mot de passe du Superviseur.
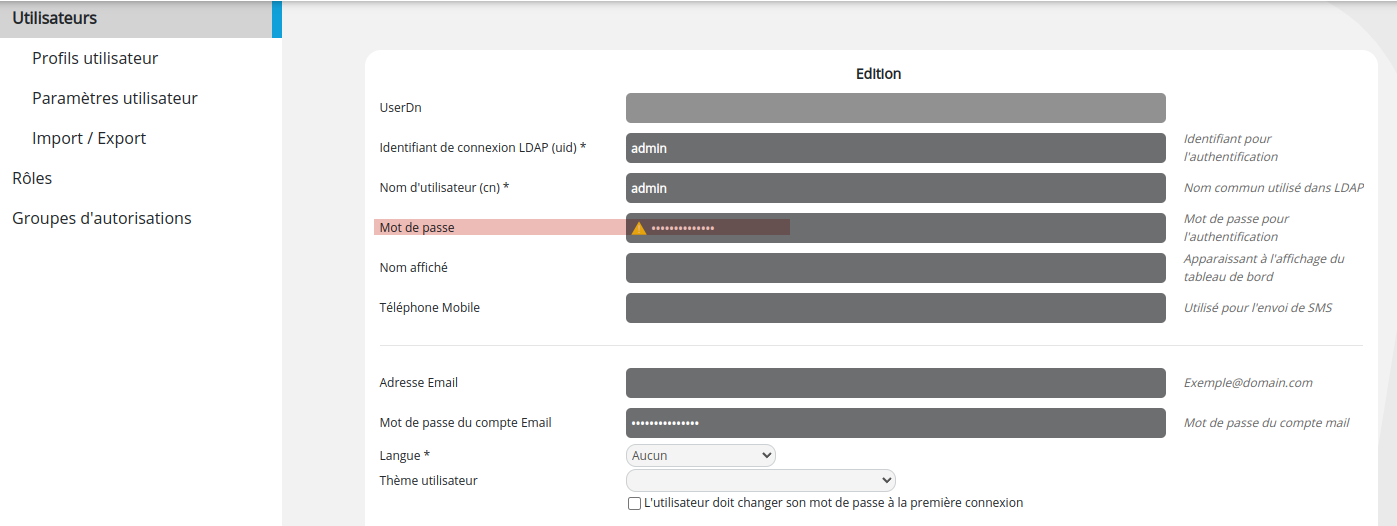
Création du compte LDAP
- Aller dans Configuration -> Gestion des utilisateurs -> Utilisateurs.
- Créer un nouvel utilisateur admin et lui attribuer tous les rôles et groupes d'autorisation.
- Dans le champ Mot de passe, entrer le nouveau mot de passe du superviseur défini ci-dessus.
Configuration des bases de données
Base de données Données d'audit
Aller dans Configuration -> Paramètres serveur -> Base de données -> Données d'audit et renseigner ici l’URL, l’utilisateur et le mot de passe.
URL : jdbc:mariadb://localhost:3306/default_ddaudit
Cette solution permet de sécuriser l’accès à la base de données d'audit.

Base de données Commentaires
Aller dans Configuration -> Paramètres serveur -> Base de données -> Commentaires et renseigner ici l’URL, l’utilisateur et le mot de passe.
URL : jdbc:mariadb://localhost:3306/default_comment
Cette solution permet de sécuriser l’accès à la base de données de commentaires.

Base de données Saisie de données
Aller dans Configuration -> Paramètres serveur -> Base de données -> Saisie des données.
Cocher la case Activer la saisir de données et sélectionner une base de données dans la liste déroulante.
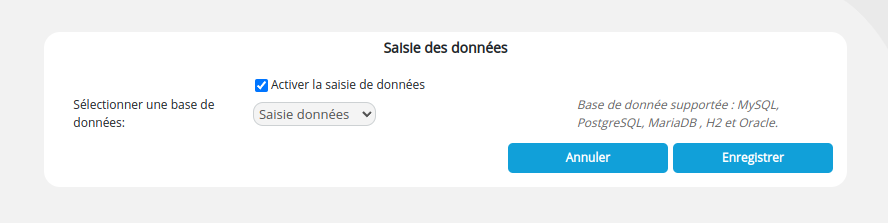
Il faut, au préalable, avoir créé une connexion à la base de données depuis le Gestionnaire des connexions aux de données dans le Studio. Consultez la page Gestionnaire des connexions aux bases de données pour plus de détails.
Entrer default.user.ddentry pour l'utilisateur et le mot de passe défini à l'étape précédente.
Le nom défini dans le champ Nom de connexion est celui qui apparaîtra dans la liste déroulante de sélection de la base de données.