Advanced System Parameters For DigDash Enterprise
This document describes some advanced tweaks that can be made in the Digdash Enterprise System (DDE). These changes concerns:
- Tomcat settings
- Allocating more memory to Tomcat
- Change Tomcat network ports
- Change Inactive / idle session timeout
- Change number of concurrent requests threads
- Enable HTTP compression
- Advanced Performance settings
- Automatic Files Cleaner
- Using several servers in cluster mode
- Other Advanced Settings
- Change application data path
- LDAP settings: Port and instance name
- Advanced parameters for Dashboard editor / viewer
The following files will be modified:
- server.xml
- Location (global Tomcat): <DDE Install>/apache-tomcat/conf/server.xml
- system.xml
- Location: <user>/Application Data/Enterprise Server/ddenterpriseapi/config/system.xml
- web.xml
- Location (global Tomcat): <DDE Install>/apache-tomcat/conf/web.xml
- Location (ddenterpriseapi): <DDE Install>/apache-tomcat/webapps/ddenterpriseapi/WEB-INF/web.xml
- Location (dashboard): < DDE Install>/apache-tomcat/webapps/digdash_dashboard/WEB-INF/web.xml
- Location (adminconsole): < DDE Install>/apache-tomcat/webapps/adminconsole/WEB-INF/web.xml
- Location (adswrapper): < DDE Install>/apache-tomcat/webapps/adswrapper/WEB-INF/web.xml
- setenv.bat
- Location: <DDE Install>/configure/setenv.bat
- dashboard_system.xml
- Location: <user>/Application Data/Enterprise Server/dashboard_system.xml
- Tomcat Settings
- Advanced Performance Settings
- Automatic files cleaning
- Using several servers in cluster mode
- Other advanced settings
Tomcat Settings
Allocating more memory to Tomcat
Modified file: setenv.bat
Find the lines at the top of the file:
set JVMMS=512
set JVMMX=512
Change both "512" numbers to the amount of memory (megabytes) you want to assign to tomcat. For instance "4096" will allocate 4GB of memory to Tomcat:
set JVMMS=4096
set JVMMX=4096
Important:
Note for Windows 32 bits:
For this reason, we recommend a 64 bits machine/OS.
Note for “PermGen space” memory
Important: If Tomcat is installed as a service
So if you want to change the memory allocated to Tomcat, it is necessary to:
.1 Uninstall it using the command sc delete tomcat7 ==
.2 Change variables and JVMMS JVMMX of setenv.bat file
.3 Restart servers_install_service.bat or servers_install_service_64.bat
Change Tomcat network port
If one or more port mandatory to Tomcat are already in use by another process, then it will not start. It is important to check for the availability of the network ports on the system. By default the three following ports are needed: 8005, 8080 and 8009.
Follow the following steps to modify them :
- Open the folder <install DDE>\apache-tomcat\bin then edit the file server.xml
- Find and replace all port values 8005, 8080 and 8009 by number of available ports on the system.
Change inactive / idle session timeout
Modified file: web.xml (global Tomcat configuration file located at <DDE Install>/apache-tomcat/conf/web.xml)
Find the lines in the file:
<session-timeout>30</session-timeout>
</session-config>
Change the value to modify the timeout of an inactive or idle session. By default the timeout is 30 minutes.
Change number of concurrent requests threads
Modified file: server.xml
By default Tomcat will not accept more than 200 simultaneous requests. This setting can be too low when the deployment addresses thousands or millions of users, or when benching the performances of the server (eg. jmeter) which execute hundreds or thousands of simultaneous requests.
To increase this limit you must add a maxthread attribute to the Connector XML tag corresponding to the connector used.
Example when the connector is http (there is no Apache web server on the front-end):
<Connector port="8080" protocol="HTTP/1.1" connectionTimeout="20000" maxthreads="400" redirectPort="8443" maxPostSize="-1" URIEncoding="UTF-8" />
Example when the connector is AJP (there is an Apache web server on the front-end):
<Connector port="8009" protocol="AJP/1.3" maxthreads="400" redirectPort="8443" maxPostSize="-1" URIEncoding="UTF-8" />
Enable HTTP compression
Modified file: server.xml
HTTP compression is used to decrease the usage of network bandwidth by compressing HTTP responses. By default this option is not enabled in Tomcat, but all modern browsers support it.
This option can compress responses up to 90% on some types of data or files: HTML, Javascript, CSS while consuming low CPU power.
Important:
HTTP compression is not supported on the AJP connector or any other protocol than HTTP(S)/1.1.
In server.xml file, add the attributes compression="on" and compressionMinSize="40000" on the connector HTTP/1.1:
Example :
<Connector port="8080" protocol="HTTP/1.1" connectionTimeout="20000" redirectPort="8443" maxPostSize="-1" URIEncoding="UTF-8" compression="on" compressionMinSize="40000"/>
The compressionMinSize attribute defines a minimal response size (in bytes) below which compression is not used. It is recommended to give it a high enough value to avoid compressing files that are already very small (PNG icons for example).
Note:
Advanced Performance Settings
Modified file: system.xml
XML syntax example:
<Property key="CORE_TP_EXECSIZE" value="64"/>
Scheduled flow execution threading
Act on the number of "threads" devoted to scheduled execution of flows (scheduler).
Available parameters:
- Name: INIT_TP_EXECSIZE
Value: integer >= 0 (default: 16)
Description: Number of threads created when the server starts - Name: CORE_TP_EXECSIZE
Value: integer >= 0 (default: 16)
Description: Number of threads to keep when the server is idle - Name: MAX_TP_EXECSIZE
Value: integer > 0 (default: 16)
Description: Maximum number of threads when the server is working
Scheduled flow execution threading
Act on the number of "threads" devoted to interactive execution of flows (admin console, dashboards, mobile, etc.).
Available parameters:
- Name: INIT_TP_PLAYSIZE
Value: integer >= 0 (default: 4)
Description: Number of threads created when the server starts - Name: CORE_TP_PLAYSIZE
Value: integer >= 0 (default: 4)
Description: Number of threads to keep when the server is idle - Name: MAX_TP_PLAYSIZE
Value: integer > 0 (defaut: 4)
Description: Maximum number of threads when the server is working
Cube Manager timeouts
Act on the way the Cube Manager component discards unused memory cubes.
Theses settings discards cubes that are not used since a period of time, even if the session is still active
Available parameters:
- Name: CUBE_TIMEOUT_INTERACTIVE
Value: minutes: > 0 (default: 10 minutes)
Description: Duration of inactivity period for a cube loaded in interactive mode (server side cube navigation)
- Name: CUBE_TIMEOUT_SYNC
Value: minutes: > 0 (default: 4 minutes)
Description: Duration of inactivity period for a cube loaded in scheduled mode (scheduled flow generation) - Name: CUBE_TIMEOUT_PERIOD
Value: minutes: > 0 (default: 2 minutes)
Description: Interval of checking when cube are inactive, should be at least min CUBE_TIMEOUT_SYNC / 2
Data cubes performance
Apart from cube compression (CUBE_COMPRESSION), all these settings will affect the performance of data cube interactive processing (expanding them into result cube during a chart display). These settings will not affect the data cube generation performance.
Available parameters:
- Name: CUBEPART_MAXSIZEMB
Value: mega-bytes: > 0 (default: 100 MB)
Description: Size of a data cube chunk in MB. A data cube chunk (or part) is a part of the data cube that can be processed (expanded) in parallel and/or distributed across different other DigDash Enterprise Server in cluster mode (see chapter "Using Several Servers In Cluster Mode" in this document). - Name: TP_MCUBESIZE
Value: threads: > 0 (default: 64 threads)
Description: Size of the thread pool for concurrent processing units for a data cube. Big cubes (eg. millions/billions rows) chunks are processed in parallel by the server and/or other servers (in cluster mode). This variable is the number of concurrent threads allowed to process these chunks on one machine. Each thread occupies a slot in the pool during its treatment. If the pool is full, the additional threads are put in a waiting queue. - Name: MCUBE_ROWS_PER_THREAD
Value: rows: > 0 (default: 100000)
Description: This is a threshold of the number of rows of a data cube above which DigDash enterprise will activate the parallel processing of cube chunks (if there is more than one chunk for this cube). Below that limit, the cube processing is not paralleled, but serialized.
- Name: CUBE_COMPRESSION
Value: boolean (default: true)
Description: As opposed to the other settings, this one will affect data cube generation performance, but not processing performance. This (de)activates the cube compression for the storage of cubes on the disk drive. By default DigDash Enterprise server compresses the data cube storage (true), lowering the storage space, but also slowing down the save of the cube (note that loading is almost not affected by this setting). So in case you want to speed up cube generation and have a load of cubes (and a big available storage disk space), you could set this to false. - Name: CUBE_UPLOAD_MODE
Value: integer: 0, 1 or 2 (default: 1)
Description: Clustering deployment only. Specify if the cube parts should be uploaded from master server to slave servers when a user interacts with the cube (1), when the cube is generated by the master (2), or never (0). Also see the chapter "Using Several Servers In Cluster Mode" in this document, section "Use The Cluster".
Other performance parameters
The following parameters are used to analyze optimize system performance.
Available parameters:
- Name: LOW_MEMORY_THRESHOLD
Value: percentage > 0 (default: 10%)
Description: This is the threshold of the percentage of free memory under which the system will raise a low memory alert. This alert can be viewed in the server status page for 24 hours. It is also recorded in the DDAudit data base when the system audit service is started.
Last, a DigDash event is fired when the threshold is reached: SYSCHECK_LOWMEM. An example of using this event can be found in the DDAudit deployment documentation.
Automatic files cleaning
The DDE platform comes with an integrated files cleaner (also known as Files GC) that cleans any unused files like old history files, cubes and other flow dependent files.
The module will clean all files that are not used anymore by any user or role wallet.
Cleaning the files will scan the indexes of all users as well as the disk to find out files which are no more linked to any indexes. Files found during the scan are removed. Removed files are the following ones : cubes files (.dcg), js files of cubes (cube_data_xx.js), models (cube_dm_xx.js) and flow (cube_view_xx.js)
This process will free disk space and can improve the search of js files which can take time if you have a lot of files (number of personal cubes * number of history files > 100000).
Depending on the age of your server and the number of files to remove (number of refresh done...), the cleaning can take lot of time during its first execution (if DigDash Enterprise is used by many users and has many personalized cubes, one to two hours).
After that, if the cleaning is done on a regular basis, it will take less time. The duration depends on the performance of the files system and the computer, so is difficult to estimate.
By default, cleaning is done everyday at midnight.
Important:
This chapter describes how to configure the activation and scheduling of this module.
(De)Activation and/or clean on startup
Activating the files cleaner can be done in two different ways:
1- From the server status page:
You can access the server status page from the welcome page by clicking the Configuration, then the Server status link.
In the Files cleaner status section, click the green arrow besides Files cleaner started - No to start the Files cleaner:
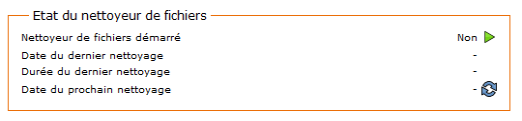
The next cleaning will start at midnight. To start the cleaning immediately, click the icon ![]() .
.
2- from the web.xml file:
Modified File: web.xml (ddenterpriseapi)
Activate or not the Files GC module, and/or make it run at server's startup.
Available parameters:
- Name: startCleaner
Value: true or false (default)
Description: - true: automatic files cleaner scheduled. Note: cleanup time slot is defined in system.xml, in the FILESGC_SCHEDXML property.
The default cleanup time slot (if none specified in system.xml, FILESGC_SCHEDXML) is every day at 0:00 - false (default): do not use automatic files cleaner
- Name: cleanOnStart
Value: true or false (default)
Description: - true: clean useless files when server starts (history, cubes, output...)
- false (default): do not clean useless files on server's startup
Files GC Scheduling
Modified file: system.xml.
Available parameters:
- Name: FILESGC_SCHEDXML
Value: XML string (encoded) (default : none)
Description: This settings contains an XML encoded string that describes the schedule.
Example:
<Property key="FILESGC_SCHEDXML" value="<Schedule frequency="daily" fromDay="11" fromHour="0" fromMinute="0" fromMonth="7" fromYear="2011" periods="1" time="0:0"/>"/>
Interesting attributes are: frequency (hourly, daily or monthly), periods (number of hours, days or months between 2 cleanups) and time (hour of the cleanup for daily and monthly frequencies). This example means every day (frequency="daily" and periods="1") at 0:00 (time="0:0").
- Name: FILESGC_SESSIONSCHECK
Value: true/false boolean (default : none, eq. true)
Description: This settings tells if the files cleaner should check for active sessions before starting (true), or if it should start even if therer are active sessions (false). In this case all active sessions will be disconnected immediately.
Example:
<Property key="FILESGC_SESSIONSCHECK" value="false"/>
Using several servers in cluster mode
To handle a big volume of data (billions of rows), it is possible to use several servers in a cluster mode. Each server becomes a processing node of the cluster. This one consists in a master server and slave servers.
The master server handles data models, documents, roles, users, sessions and refreshing of cubes and flows. Exactly like a standard Digdash Enterprise server in a mono-machine deployment.
Additional slave servers are only used to help interactive cube expanding, during flow display, filtering, drill-down, etc.
<TODO schema>
Install DigDash Enterprise in cluster mode
Pré-requisite: several machines connected to the same network
Master server (on the most powerful machine of the cluster):
- Standard DigDash Enterprise installation (see documentation).
- Start the server as usual with start_servers.bat
Slave server (on all other machines of the cluster):
- Standard DigDash Enterprise installation (see documentation).
The difference is that a slave server does not need a license to be used as a processing unit of the cluster. It also does not need an LDAP directory neither does he need a SVN document server. Finally it does not need the digdash_dashboard web application module, so the war archive could be optionally removed from Tomcat. - Start only the Tomcat module with start_tomcat.bat
Configure the cluster
Procedure to repeat on all servers of the cluster
- With a browser, connect to the DigDash Enterprise home page page (eg. http://<serveur>:8080)
2. Click on Configuration, then Server Parameters
3. Log in as DigDash Enterprise administrator (admin/admin by default) to display the server parameters page
4. Click on the link Cluster Parameters at the bottom of the page
5. Fill the different fields according to each server machine (see below for details)
Section System Performance
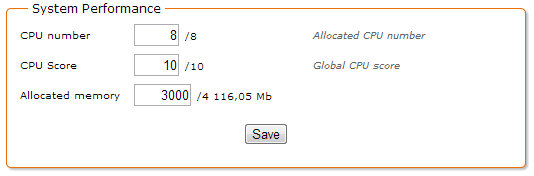
The section System Performance defines the performance specifications of the current machine in the cluster. The parameters CPU Number, CPU Score and Allocated Memory are used to dispatch the calculation load at the best.
- CPU Number: the number of processors * number of cores per processor. Eventually multiplied bay a factor if the processors have a technology like Hyper-Threading. By default, -1 uses the data as read by the operating system.
- CPU Score: This is an arbitrary score between 1 and 10 which allows sorting the different machines of the cluster according to their global performance (case of an heterogeneous cluster). By default -1 gives an average score (5).
- Allocated Memory: the maximum fraction of the allocated memory allowed to be used for processing cubes. This value is lower or equal to the maximum memory allocated to Tomcat. By default -1 allows all the memory.
Section Authorized Clusters
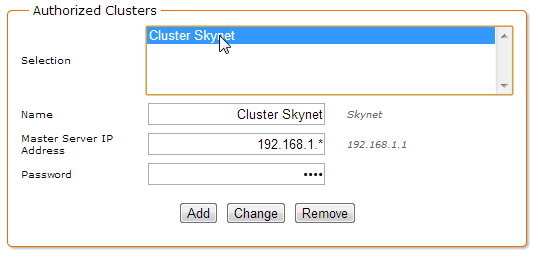
The section Authorized Clusters is used to specify if the current server can be used in one or more clusters. Actually, a server can be used in different DigDash Enterprise clusters. This section restrains this server to be used as a slave by only specified clusters masters (Selection list).
This is also in this section where we define an optional password of the current server in the cluster.
To add a cluster allowed to use this server as a slave:
- Name: name of the authorized cluster (arbitrary, used only as a reference in the UI)
2. Master Server IP Address: address of the cluster's master server (eg. http://192.168.1.1)
3. Password: password for the slave server in the context of the selected cluster
4. Click on the Add button to add this cluster to the list of authorized clusters
Section Cluster Definition
To be filled only on the master server of the cluster
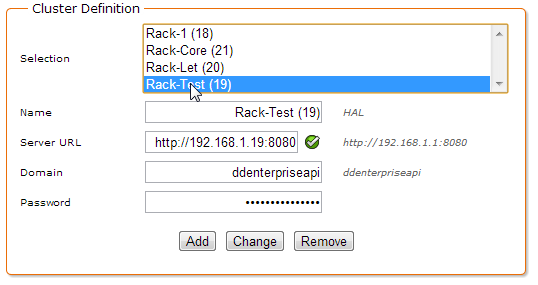
The section Cluster Definition concerns only the master server. This is where we define the list of the slave server machines (Selection list, fields Name, Address, Domain and Password).
To add a slave server to the cluster:
- Name: name of the slave machine (arbitrary)
2. Server URL: URL of the slave server (eg. http://192.168.1.123:8080)
3. Domain: DigDash Enterprise domain (by default ddenterpriseapi)
4. Password: password for the slave as you defined it previously during the slave configuration (Authorized Cluster section, Password field)
5. Click on the Add button to add this slave server to the cluster.
Use the cluster
In a simple cluster deployment, there is nothing more to do than what was previously described.
However there are some interesting details that can help tuning the performance of the cluster.
The cluster is used depending on the size of a data cube. Under a specified threshold, depending on the cube, the master machine and the slaves, it is possible that the cluster mode would not be used. But if the size of one or more data cubes becomes big, for instance above hundreds of millions of rows, these cubes will be split in parts and their calculation (expanding) will be parallelized on all available processors in the cluster to decrease the global response time. This will be done each time a dashboard user (or mobile user, etc.) will request data from the cube.
It is important to note that cube generation (data source refresh) is done solely by the master server. Slaves are only used for interactive cube expanding (flow display, filtering, drill-down, etc.).
By default, the different part of the cube to be processed is sent on demand to the slaves (if they do not already have them). This can induce a slowdown of the system on the first expand requested by a user, especially on low bandwidth network (< 1 gigabit).
Nevertheless, there are different ways to avoid this network bottleneck. Here are some suggestions:
A first way is to have the cubes folders (sub-folder of Application Data/Enterprise Server/ddenterpriseapi by default) on a centralized network disk reachable from all the cluster machines. For instance through a symbolic link (Linux, NFS). This link should be established for all the cluster machines. The principle is that the master server will directly generate the data cube files in that network folder, and then when a user will interact with the system, master and slaves will all have a common view of the cubes. Because reading the cube files is done only once in the cube life-cycle (in-memory cube), impact of the network folder on the performance is negligible.
Another way is to use a third-party folder synchronization tool between the cluster machines. This tool will copy the cubes folder from the master to the slaves after cube generation for instance. The principle is that the master server will generate data cube in its local folder, then the synchronization tool will transfer the folder (probably using an optimized delta algorithm) on all the slaves machines. All of this outside the server main activity periods if possible. Master and slaves will all have an identical view of the cubes.
Other advanced settings
Change application data path
By default DigDash Enterprise stores its configuration, data models, information wallets, cube flow history and other work files in the operating system user folder, in a sub-folder Application Data/Enterprise Server/<domain>.
For example on Windows 7 this folder is:
C:\Users\<user>\AppData\Roaming\Enterprise Server\ddenterpriseapi
Under certain circumstances, it can be useful to change this folder path, either to get more storage on another drive, either for organizational purposes, scripting, etc.
There are different ways to change this path.
On the global level (Tomcat)
Modified file: setenv.bat
The optional Tomcat parameter digdash.appdata is used to specify a folder path where DigDash Enterprise will store its data files.
In the file <DDE Install>/configure/setenv.bat add the line:
@set CATALINA_OPTS = -Ddigdash.appdata=<path to the new app data folder>
Important :
If this folder does not exist, DigDash Enterprise will create it. The data will not be stored directly in this folder but in another sub-folder <digdash.appdata>/Enterprise Server/<domain>
Example:
To make Digdash Enterprise on another hard drive than the system drive:
- Modify <DD Install>/configure/setenv.bat eby adding the line:
@set CATALINA_OPTS=-Ddigdash.appdata=D:/digdashdata
2. Restart Tomcat server
3. A folder D:\digdashdata\Enterprise Server\ddenterpriseapi is created and will contain the all the data files of DigDash Enterprise
Pro:
This configuration is done at the setenv.bat script level, it will not be overwritten during an update of the DigDash Enterprise WAR files.
Cons:
This configuration is global for all the DigDash Enterprise domains on this Tomcat server. However the data for the different domains are stored in their own sub-folder. There is no risk of data collision between the domains.
At the domain level (context's web.xml)
Modified File: web.xml (ddenterpriseapi)
The variable AppDataPath defined in this file (empty value by default) has the same behavior than the Java parameter digdash.appdata detailed above.
The only difference is this parameter is specific to a DigDash Enterprise domain.
Pros:
Configuration specific for a DigDash Enterprise domain
Cons:
Updating DigDash Enterprise with new WAR files will overwrite this configuration (web .xml is overwritten when deploying new WAR files).
LDAP settings (adswrapper): Port and instance name
LDAP server network port (adswrapper)
Modified file: web.xml (adswrapper)
The variable ads.ldap.port (default value: 11389) defines the network port used by the LDAP server integrated in DigDash Enterprise. You must change this value if the port is already used by another process on the system, or another LDAP instance (of another DigDash domain on the same system for example).
LDAP instance name (adswrapper)
Modifier file: web.xml (adswrapper)
The variable ads.instance.name (default value: ldapdigdash) defines the name of the LDAP directory instance used by DigDash enterprise. You must change this value if two DigDash domains deployed in the same Tomcat need to use their own LDAP instance.
Advanced parameters for the dashboard editor / viewer
dashboard_system.xml parameters
Modified file: dashboard_system.xml
This file is located in the folder <user>/Application Data/Enterprise Server/dashboard_system.xml. By default this file does not exist, you must create it in order to modify the advanced parameters of the dashboard editor / viewer. It is an XML file with the following format:
<Property key="<parameter name>" value="<parameter value>"/>
<Property key="<parameter name>" value="<parameter value>"/>
<Property key="<parameter name>" value="<parameter value>"/>
</SystemProperties>
Note:
Available parameters:
- Name: SERVERURL
Value: URL of the DigDash Enteprise server
Description: URL of the server on which the dashboard must connect in priority. - Name: DOMAIN
Value: Name of the DigDash Enterprise domain
Description: Name of the domain on which the dashboard must connect in priority. - Name: FORCESERVERURL
Value: Boolean (default: false)
Description: Used with parameter SERVERURL. Forces the server on which the dashboard must connect. The user can not choose another server. - Name: FORCEDOMAIN
Value: Boolean (default: false)
Description: Used with parameter DOMAIN. Forces the domain on which the dashboard must connect. The user can not choose another domain. - Name: GRIDSIZEEDITOR
Value: Integer (default: 10)
Description: Size in pixels of the magnetic grid in the dashboard editor. - Name: THEME
Value: Name of the theme (default: none)
Description: Name of the graphical theme to be applied for users who do not have a specified theme in their settings. - Name: urlLogout
Value: URL
Description: Specify a URL to redirect the user when he disconnect from the dashboard. Default behavior is to come back to the login screen. See “Redirection on dashboard logout” paragraph. - Name: CANCHANGEPASSWORD
Value: Boolean (default: false)
Description: Activate a hyperlink “Lost password” in the login page of the dashboard. This hyperlink sends a password reset code to the user’s email address. See “Activate reset password feature”.
Example of a dashboard_system.xml file:
<Property key="SERVERURL" value="http://localhost:8080"/>
<Property key="FORCESERVERURL" value="true"/>
<Property key="DOMAIN" value="ddenterpriseapi"/>
<Property key="FORCEDOMAIN" value="true"/>
<Property key="GRIDSIZEEDITOR" value="15"/>
<Property key="THEME" value="Flat"/>
<Property key="CANCHANGEPASSWORD" value="true"/>
</SystemProperties>
Redirection on dashboard logout
You can specify a URL to display when the user disconnect from the dashboard (Logout button).
Modified file: web.xml (digdash_dashboard) or dashboard_system.xml
File web.xml (digdash_dashboard) is located in <DDE Install>/apache-tomcat/webapps/digdash_dashboard/WEB-INF/web.xml.
Modify the value of the parameter urlLogout as in the following example. By default the value is empty, which means the logout action is to return to the dashboard authentication page:
<param-name>urlLogout</param-name>
<param-value>http://www.digdash.com</param-value>
</init-param>
Relative URLs are allowed. They are relative to the location of index.html file in the digdash_dashboard application:
<param-name>urlLogout</param-name>
<param-value>disconnected.html</param-value>
</init-param>
Alternatively, you can modify this value in dashboard_system.xml file:
<Property key="urlLogout" value="disconnected.html"/>
Activate reset password feature
You can activate the reset password feature to allow a user to reset his password when he forgets it. The feature displays a hyperlink “Lost password” in the login page of the dashboard. The hyperlink sends an email to the user containing a reset password code. Then the user is redirect to a reset password form and prompted to enter this code and a new password.
Modified file: web.xml (digdash_dashboard) or dashboard_system.xml, and Server settings page
Prerequisites on DigDash server:
- The feature must also be activated in the Server settings page / Advanced / Allow password reset
- A valid email server must be configured in Server Settings page / Advanced / System Email Server
- The users must have a valid email address configured in the LDAP field digdashMail
On dashbpard side, the activation of this feature is done with the variable CANCHANGEPASSWORD set to true in web.xml (digdash_dashboard):
<param-name>CANCHANGEPASSWORD</param-name>
<param-value>true</param-value>
</init-param>
Alternatively, you can modify this value in dashboard_system.xml file:
<Property key="CANCHANGEPASSWORD" value="true"/>
Optional: Customization of the reset code email
Email subject and body can be customized in the following way:
- Start DigDash Studio
2. Menu Tools / Dictionary manager...
3. Right-click on GLOBAL section then Add…Key name: LostPasswordMailSubject
Enter the subject of the email in the languages of your choosing.
- Right-click on GLOBAL section then Add…
Key name: LostPasswordMailText
Enter the body of the email in the languages of your choosing. Make sure the body of the email contains the keyword ${code} at least. This keyword will be substituted by the password reset code. Another available keyword is ${user}. We discourage putting too much information in this email. For instance in the default subject and body we only include the password reset code.